CANEO series4x + Allen-Bradley — Add-On Instruction Guide
This guide walks through integrating a CANEO series4x button with an Allen-Bradley ControlLogix or CompactLogix controller in Studio 5000 Logix Designer. By the end you'll be reading the button's state from ladder logic and writing LED scenes, colors, numbers, and display text to it — all through a CAPTRON Add-On Instruction (AOI) that hides the byte-level plumbing.
Most IO-Link masters on EtherNet/IP hand the controller its process data as one flat SINT array covering every port on the block. Several CANEO series4x fields — the actuation count, the displayed number, and the active LEDs — are larger than one byte, and some masters also swap the byte order. The AOI takes care of both: you point it at the master's raw arrays and tell it where your port starts, and it gives you back two clean, named structures to read and write.
Prerequisites
Before starting, make sure:
- Studio 5000 Logix Designer is installed and you have a project open for your controller. This example uses a 5069-L306ER CompactLogix on firmware v38.
- An IO-Link master is configured under I/O Configuration and its input and output data are visible as controller tags. This example uses a MURR IMPACT67 Pro E DIO8 IOL8 M12L 5P (54631).
- The CANEO series4x is wired to an IO-Link port on the master (this example uses port 2).
- You have downloaded
CANEOseries4x_V34_AOI.zipand unzipped it to get the two AOI files (see Download at the end of this guide). - You have the CANEO series4x process data layout handy for the meaning of each value: series4x Process Data.
Choose the LED control mode
The series4x only uses the output process data you send it if the button is set to accept it. This is the IO-Link parameter LED Control Mode, which you'll find in the IODD under LEDs → LED Control Mode:
| LED Control Mode | What the button shows | AOI to use |
|---|---|---|
Automatic Scene selection | Scenes are selected by the button's own triggers. The output process data is unused. | — |
Scene controlled by IO-Link Process Data | The LED ring and display show one of the eight scenes configured in the IODD. You pick the scene, and optionally the number or text, from the PLC. | AOI_CANEOseries4x_Scene_Control_v34 |
Advanced control by IO-Link Process Data | The PLC sets everything directly: which LEDs are on, their RGB color, effect, brightness, and each display digit. | AOI_CANEOseries4x_Advanced_Control_V34 |
Scene control covers most applications. Use Advanced control when eight scenes aren't enough — for example to light individual LEDs or build a scrolling text. For details on each mode, see series4x LED (and Display) Control.
Pick one AOI per button. The two AOIs share the same input structure, but their output structures are different and match only their own LED Control Mode. Set the LED Control Mode on the button first, then use the matching AOI.
1. Import the Add-On Instructions
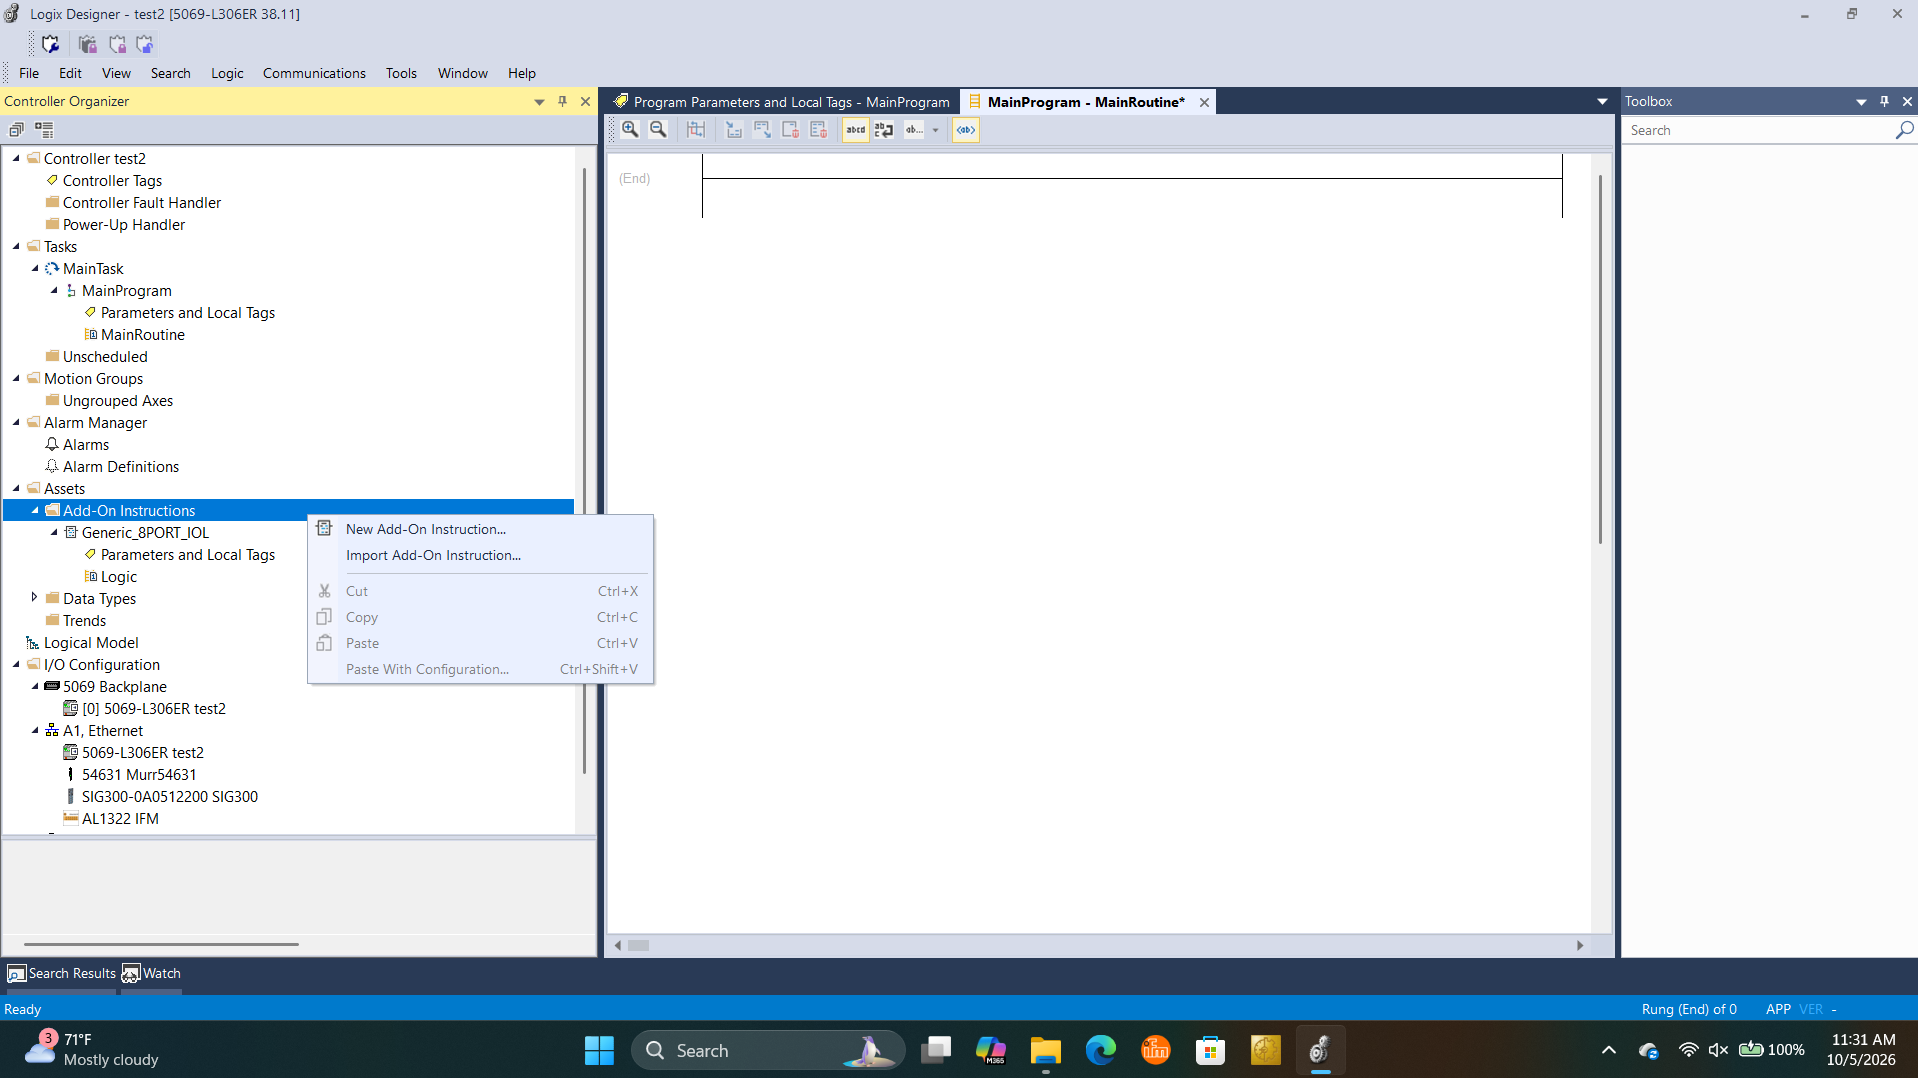
In the Controller Organizer, expand Assets, then right-click Add-On Instructions and choose Import Add-On Instruction….
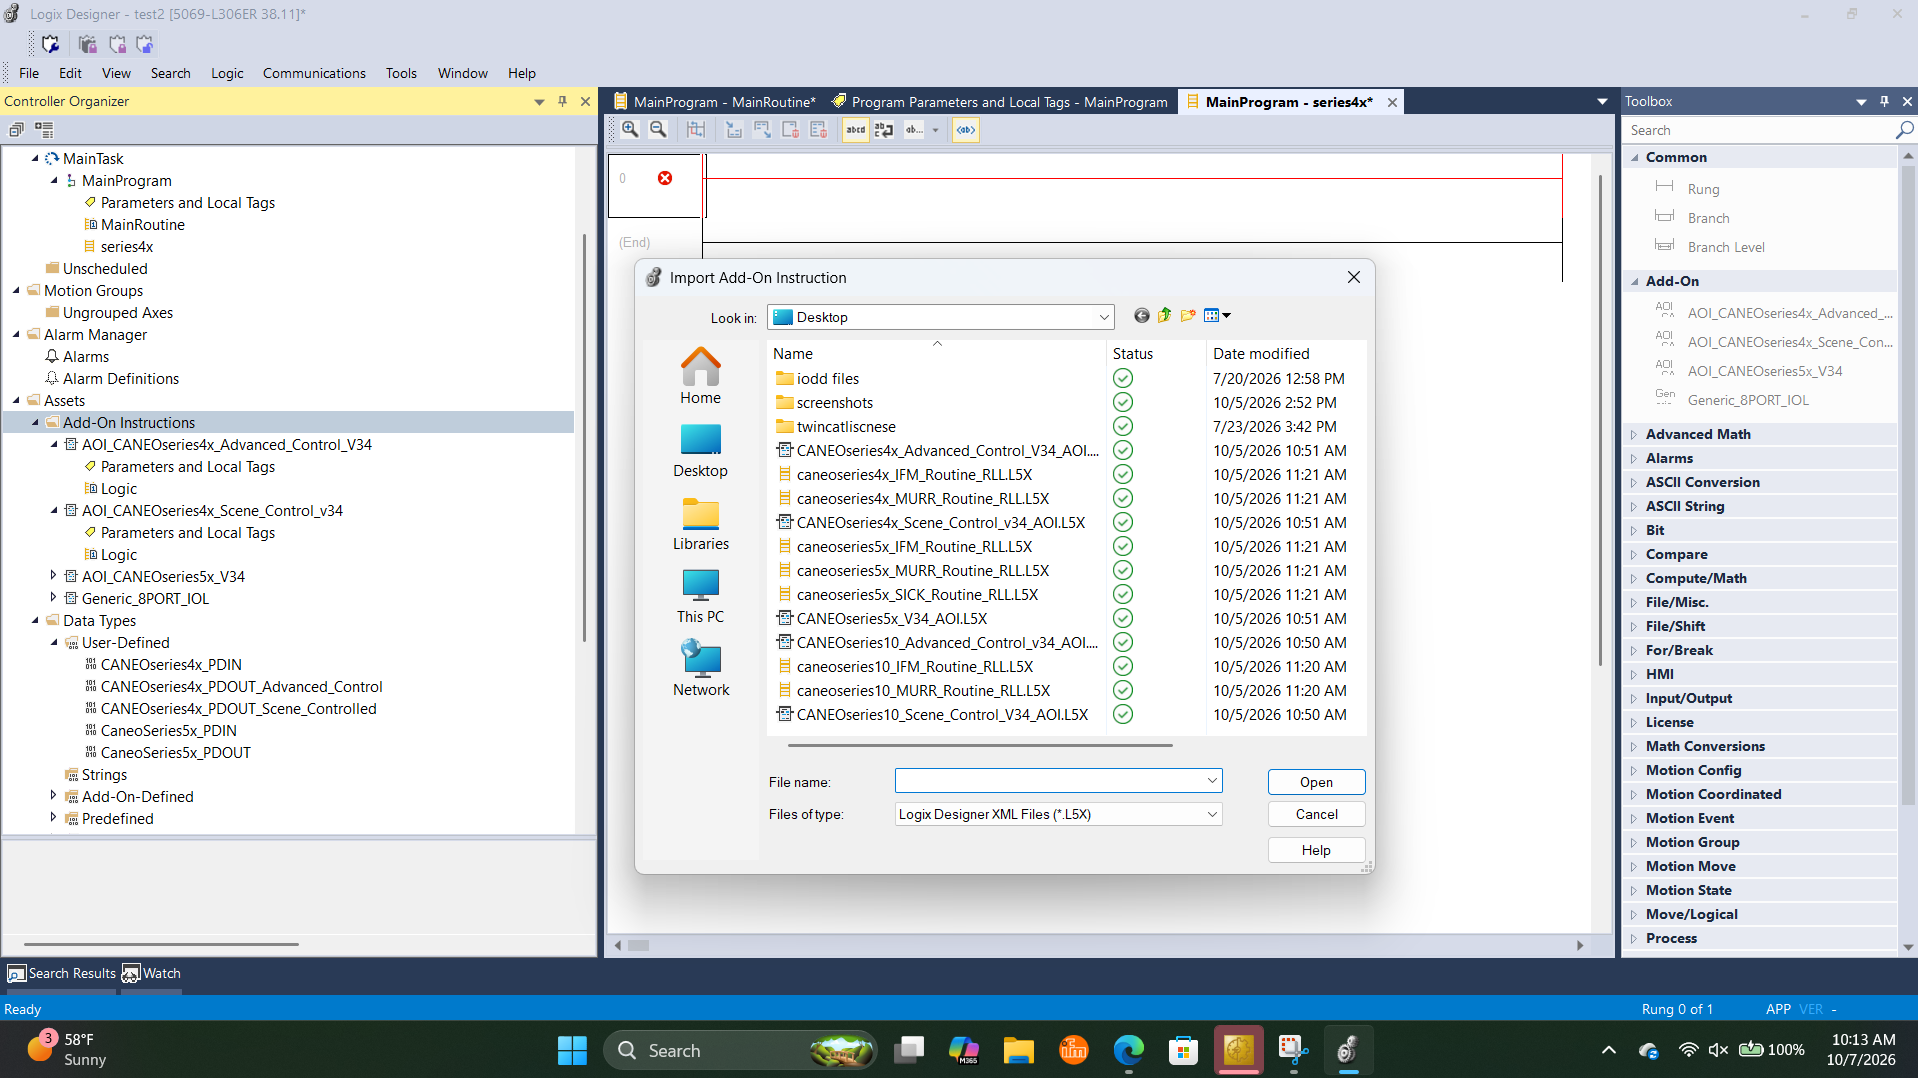
Browse to the unzipped files and import CANEOseries4x_Scene_Control_v34_AOI.L5X, CANEOseries4x_Advanced_Control_V34_AOI.L5X, or both. Confirm the import dialog that follows.
After the import, the AOIs appear under Add-On Instructions, and their user-defined data types (UDTs) appear under Data Types → User-Defined:
CANEOseries4x_PDIN— the process data coming from the button. Used by both AOIs.CANEOseries4x_PDOUT_Scene_Controlled— the process data going to the button in Scene control mode.CANEOseries4x_PDOUT_Advanced_Control— the process data going to the button in Advanced control mode.
2. AOI parameters
Open the AOI definition and switch to the Parameters tab to see what the instruction expects. Both AOIs have the same parameters — only the data type of IOL_PD_OUT differs.
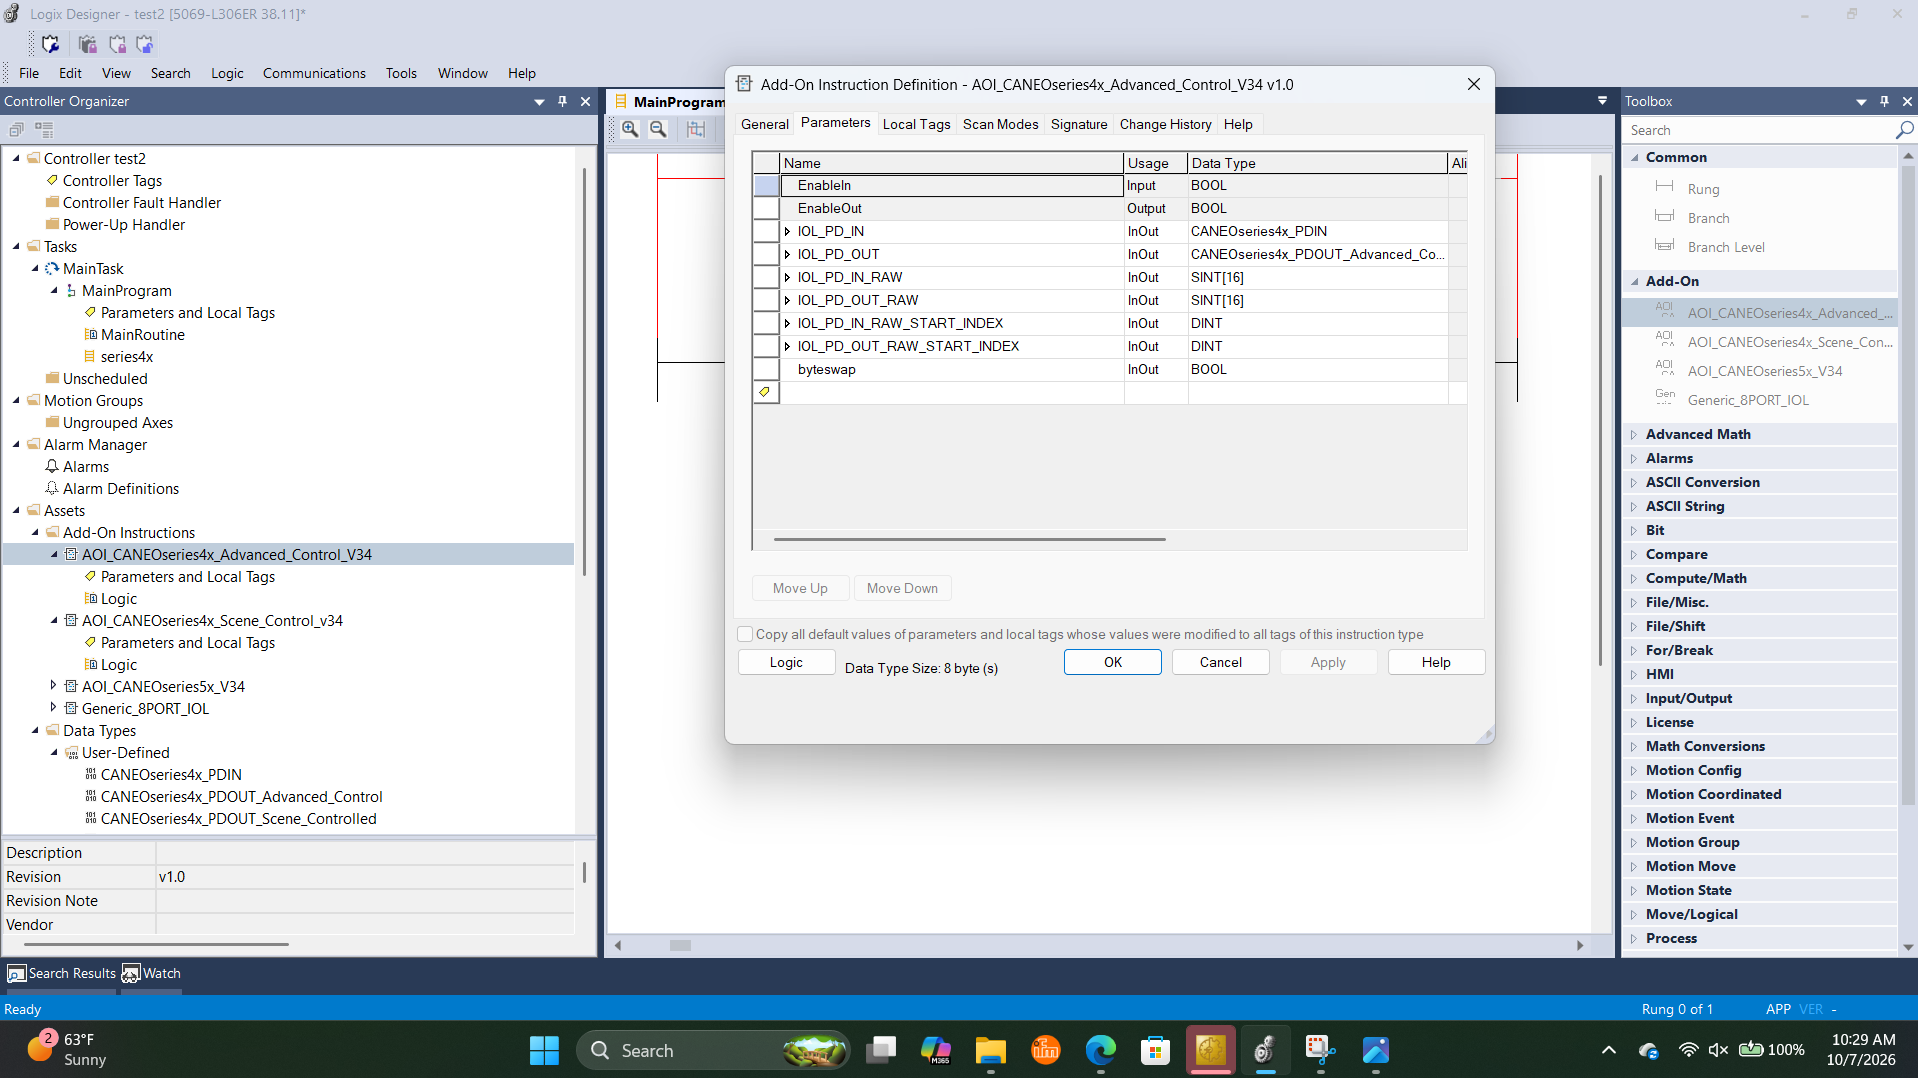
| Parameter | Data type | Description |
|---|---|---|
IOL_PD_IN | CANEOseries4x_PDIN | Structure the AOI fills with the CANEO series4x input process data. Read the button's state from here. See Reading the button. |
IOL_PD_OUT | CANEOseries4x_PDOUT_Scene_Controlled or CANEOseries4x_PDOUT_Advanced_Control | Structure you write to. The AOI packs it into the output process data. See Scene control and Advanced control. |
IOL_PD_IN_RAW | SINT[16] | The raw IO-Link input process data array from the IO-Link master (as defined by the master's EDS file). |
IOL_PD_OUT_RAW | SINT[16] | The raw IO-Link output process data array from the IO-Link master (as defined by the master's EDS file). |
IOL_PD_IN_RAW_START_INDEX | DINT | Index of the first input byte of the port the CANEO series4x is connected to. Consult your IO-Link master's manual for the byte layout. |
IOL_PD_OUT_RAW_START_INDEX | DINT | Index of the first output byte of the port the CANEO series4x is connected to. Consult your IO-Link master's manual for the byte layout. |
byteswap | BOOL | Set to 1 if your IO-Link master swaps the byte order of the process data. Default is 0 (no swap). |
Do I need byte swapping? IO-Link masters don't all format process data the same way. Some present each 16-bit word with its two bytes swapped. Masters from Turck, IFM, and Comtrol commonly do this. If display digits appear in swapped pairs, or values like the actuation count look wrong, set
byteswapto1.
3. Add the AOI to your routine
Open your routine (here MainProgram → series4x) and add the AOI that matches your LED Control Mode to a rung — you'll find both in the Toolbox under Add-On. Every operand starts as a question mark.
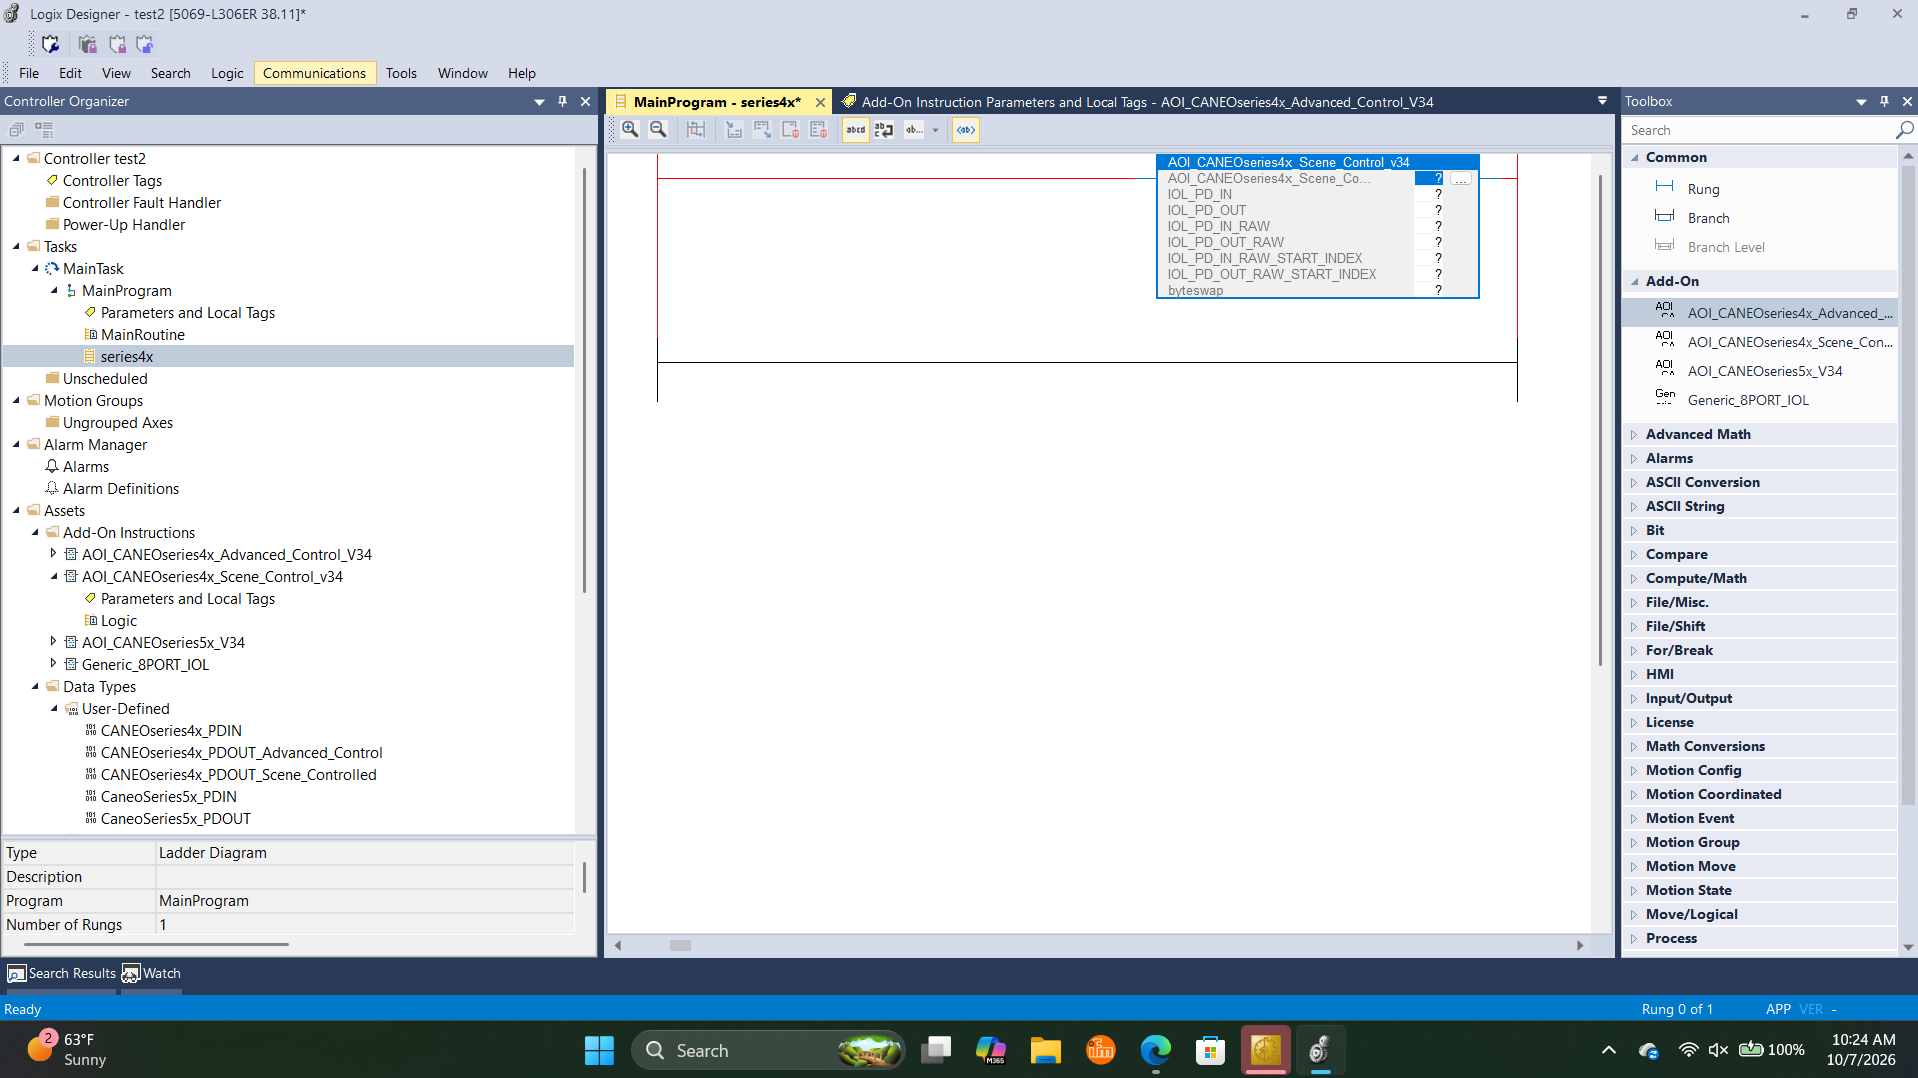
Fill in the operands one by one. For the tags that don't exist yet, right-click the question mark and choose New Tag:
- AOI instance — create a new tag of the AOI's type (e.g.
AOI_port2_MURR). Use one instance per button. IOL_PD_IN— create a new tag of typeCANEOseries4x_PDIN(e.g.CD40_PDIN_port2).IOL_PD_OUT— create a new tag of the matching output type (e.g.CD40_PDOUT_port2of typeCANEOseries4x_PDOUT_Scene_Controlled).IOL_PD_IN_RAW/IOL_PD_OUT_RAW— select the IO-Link master's input and output data arrays from the Controller Tags.IOL_PD_IN_RAW_START_INDEX/IOL_PD_OUT_RAW_START_INDEX— enter the index of the first input and output byte of the port the CANEO series4x is connected to. These values are specific to your IO-Link master. If your master (or the master manufacturer's own AOI) already gives you a separate array per port, the start index is most likely0— see Using integer arrays.byteswap—0or1, depending on your master (see above).
Example: MURR IMPACT67 (54631), port 2
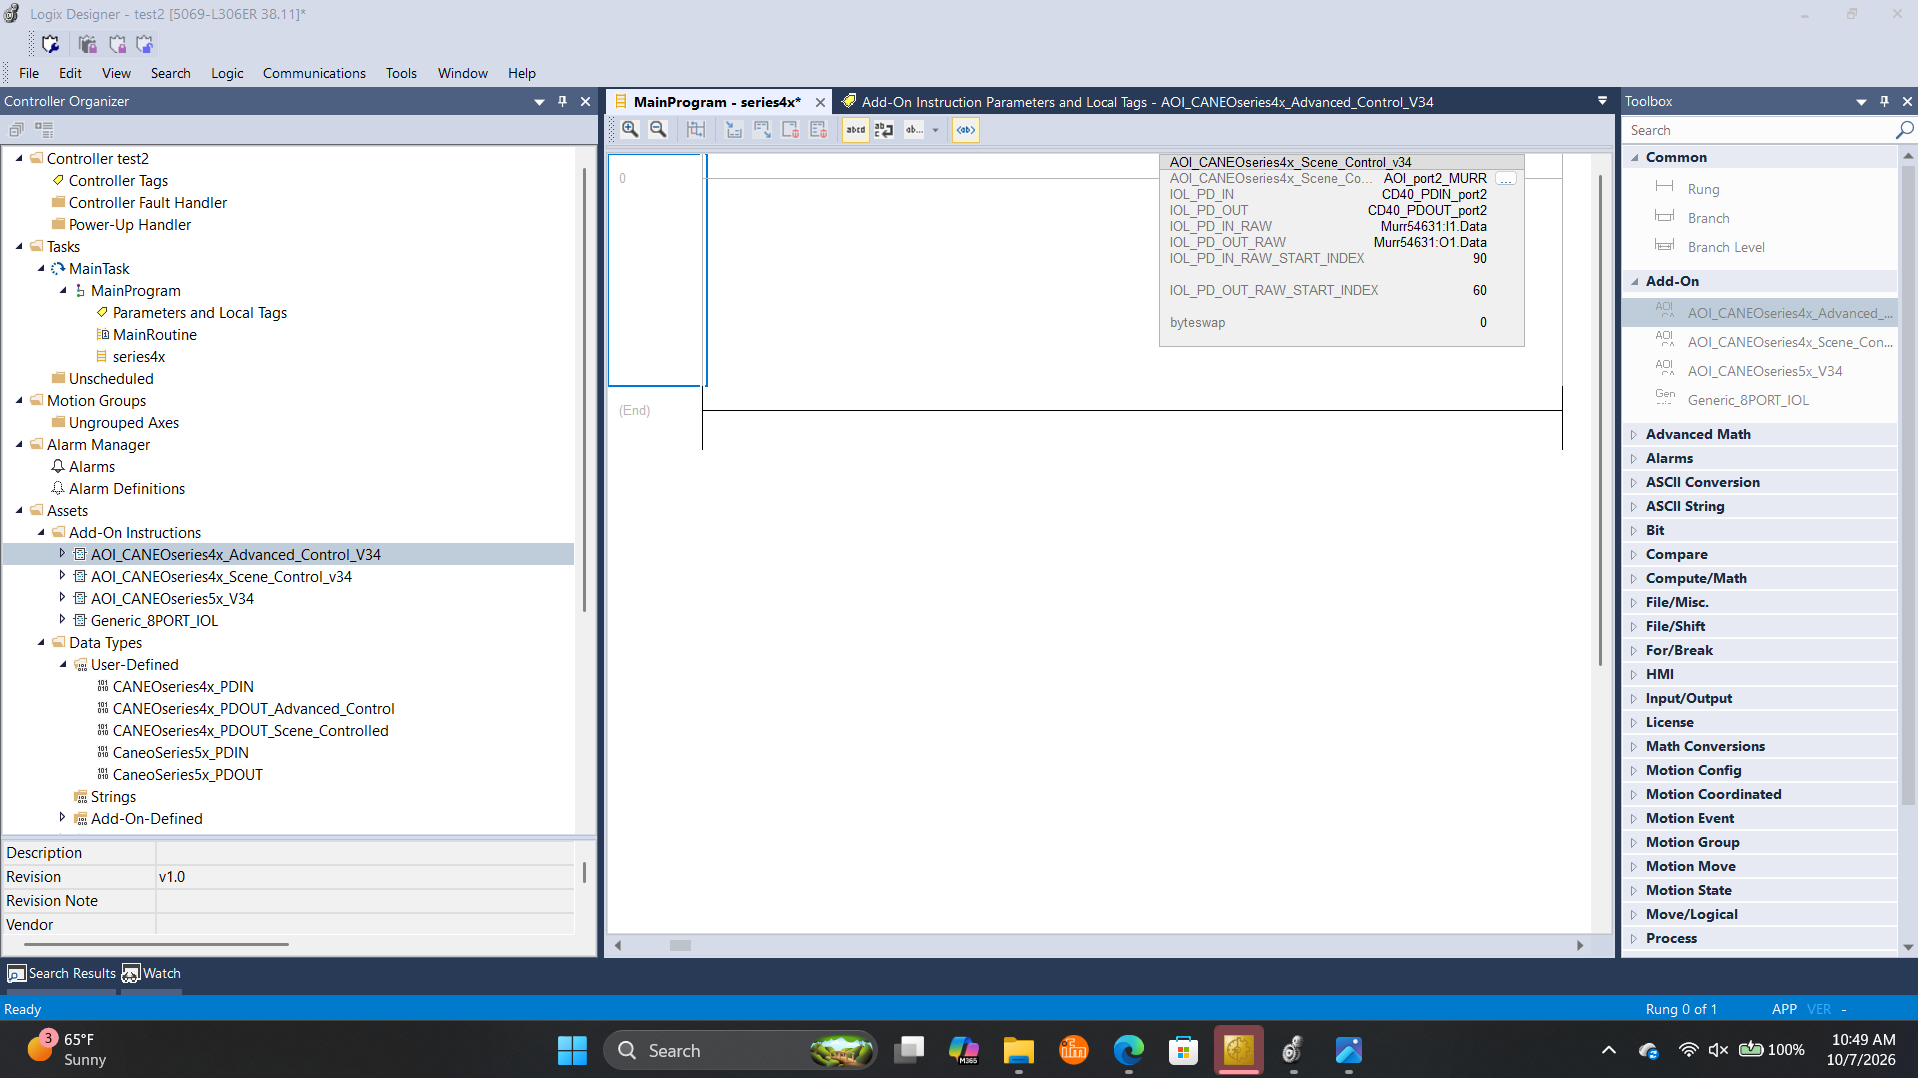
| Operand | Value | Why |
|---|---|---|
| AOI instance | AOI_port2_MURR | Named after the port and the master it serves. |
IOL_PD_IN | CD40_PDIN_port2 | Named after the part number (CD40), the type of process data, and the port. |
IOL_PD_OUT | CD40_PDOUT_port2 | Same naming scheme for the output side. |
IOL_PD_IN_RAW | Murr54631:I1.Data | The MURR block's complete input data array, stored under Controller Tags. |
IOL_PD_OUT_RAW | Murr54631:O1.Data | The MURR block's complete output data array. |
IOL_PD_IN_RAW_START_INDEX | 90 | First input byte of port 2 in the MURR input array. |
IOL_PD_OUT_RAW_START_INDEX | 66 | First output byte of port 2 in the MURR output array. |
byteswap | 0 | The MURR block does not swap bytes. |
In this example the entire MURR data array is passed in, and the start indexes tell the AOI where port 2's data begins inside it. To connect a button on another port, add a second AOI instance with its own PDIN/PDOUT tags and that port's start indexes.
4. IOL_PD_IN — reading the button
CANEOseries4x_PDIN is the same for both AOIs. It holds the button's actuation state, its pin states, and its sensor readings.
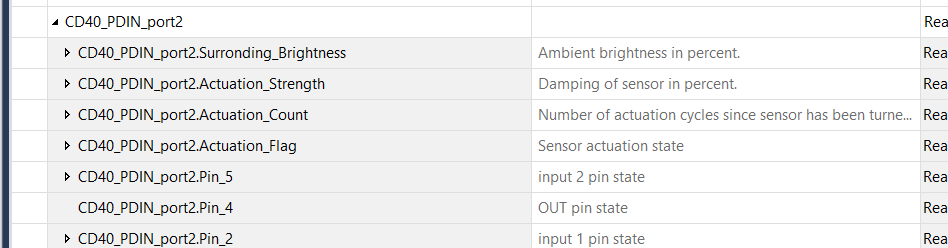
| Member | Data type | Description |
|---|---|---|
Surronding_Brightness | SINT | Ambient brightness measured by the button's light sensor, in percent (0…100). |
Actuation_Strength | SINT | Damping of the sensor, in percent (0…100). |
Actuation_Count | INT | Number of actuations since the button was powered on. Resets on restart and after 65535. |
Actuation_Flag | SINT | Sensor actuation state: 0 = idle, 1 = actuated. |
Pin_5 | SINT | Input 2 (E2) pin state: 4 = input off, 5 = input on, 8 = pin unused. |
Pin_4 | BOOL | OUT pin state: 0 = output off, 1 = output on. |
Pin_2 | SINT | Input 1 (E1) pin state: 4 = input off, 5 = input on, 8 = pin unused. |
Actuation_Countabove 32767 shows as negative. The button counts up to65535, butINTin Logix is signed. Past32767the tag rolls over to negative values. If you need the full range, copy it into aDINTand add65536when it's negative.
For the full input layout, see series4x Process Data.
5. IOL_PD_OUT — Scene control mode
Use CANEOseries4x_PDOUT_Scene_Controlled with AOI_CANEOseries4x_Scene_Control_v34 when the LED Control Mode is Scene controlled by IO-Link Process Data.
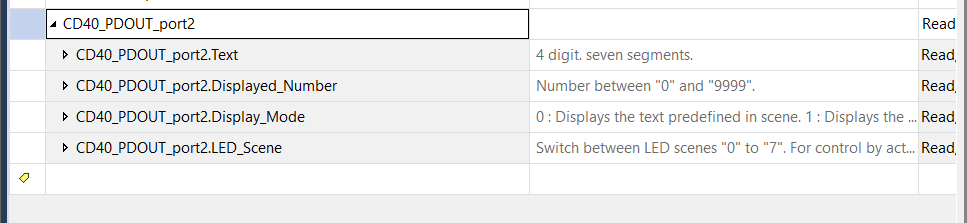
| Member | Data type | Description |
|---|---|---|
Text | STRING | Text shown on the 4-digit, 7-segment display — up to 4 characters. Shown when Display_Mode = 2. |
Displayed_Number | INT | Number shown on the display, 0…9999. Shown when Display_Mode = 1. |
Display_Mode | SINT | What the display shows: 0 = the text defined in the active scene (IODD), 1 = the number from Displayed_Number, 2 = the characters from Text. |
LED_Scene | SINT | Active LED scene, 0…7. Write -1 (255) to let the button select the scene from its actuation and input pins instead. |
The scenes themselves — color, effect, and display text for each of the eight — are configured in the IODD. See series4x LED Scenes.
Display fields apply to Display variants only. On a series4x without a display,
Text,Displayed_Number, andDisplay_Modehave no effect.
6. IOL_PD_OUT — Advanced control mode
Use CANEOseries4x_PDOUT_Advanced_Control with AOI_CANEOseries4x_Advanced_Control_V34 when the LED Control Mode is Advanced control by IO-Link Process Data.
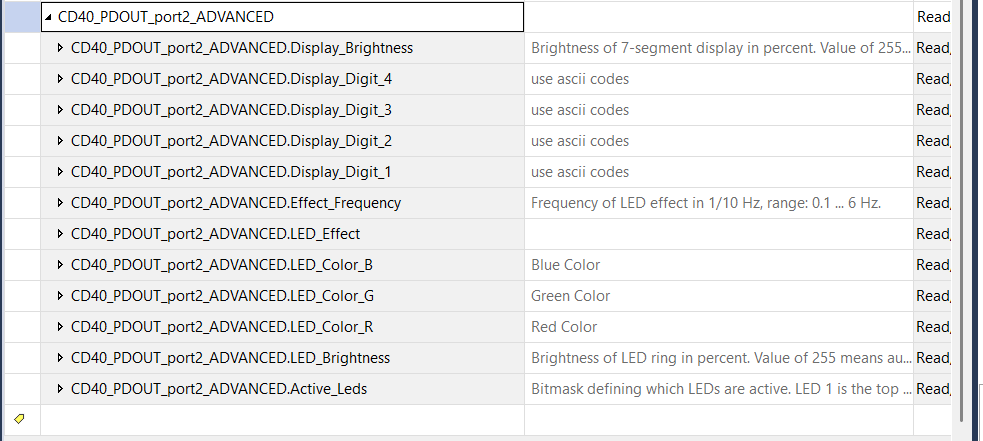
| Member | Data type | Description |
|---|---|---|
Display_Brightness | SINT | Brightness of the 7-segment display in percent (0…100). Write -1 (255) for automatic brightness. |
Display_Digit_4 | SINT | Character for digit 4, as an ASCII code. |
Display_Digit_3 | SINT | Character for digit 3, as an ASCII code. |
Display_Digit_2 | SINT | Character for digit 2, as an ASCII code. |
Display_Digit_1 | SINT | Character for digit 1, as an ASCII code. |
Effect_Frequency | SINT | Frequency of the LED effect in 1/10 Hz, 1…60 (0.1…6 Hz). 0 = default frequency. |
LED_Effect | SINT | LED effect number. See the LED Effects reference. |
LED_Color_B | SINT | Blue component of the LED color, 0…255. |
LED_Color_G | SINT | Green component of the LED color, 0…255. |
LED_Color_R | SINT | Red component of the LED color, 0…255. |
LED_Brightness | SINT | Brightness of the LED ring in percent (0…100). Write -1 (255) for automatic brightness. |
Active_Leds | INT | Bitmask of the LEDs that are on. Bit 0 = LED 1 (top left), increasing clockwise. A 1 bit turns that LED on; -1 turns all 16 on. |
Values above 127 are written as negatives.
SINTin Logix is signed (-128…127), but most of these fields take0…255. To send a value above 127, write it minus 256 — for example-1for255(full color or automatic brightness) or-128for128. The same applies toActive_Leds:-1sets all 16 bits.
The display digits take ASCII codes, not characters. Write the number of the character, not the character itself — for example
65forA,48for0, or64for@. The full list of characters the 7-segment display can show, and how to build custom segment patterns, is in series4x Display Content.
7. Usage example — Scene control
The ladder logic below switches LED scenes based on the button's OUT pin and shows a number on the display.
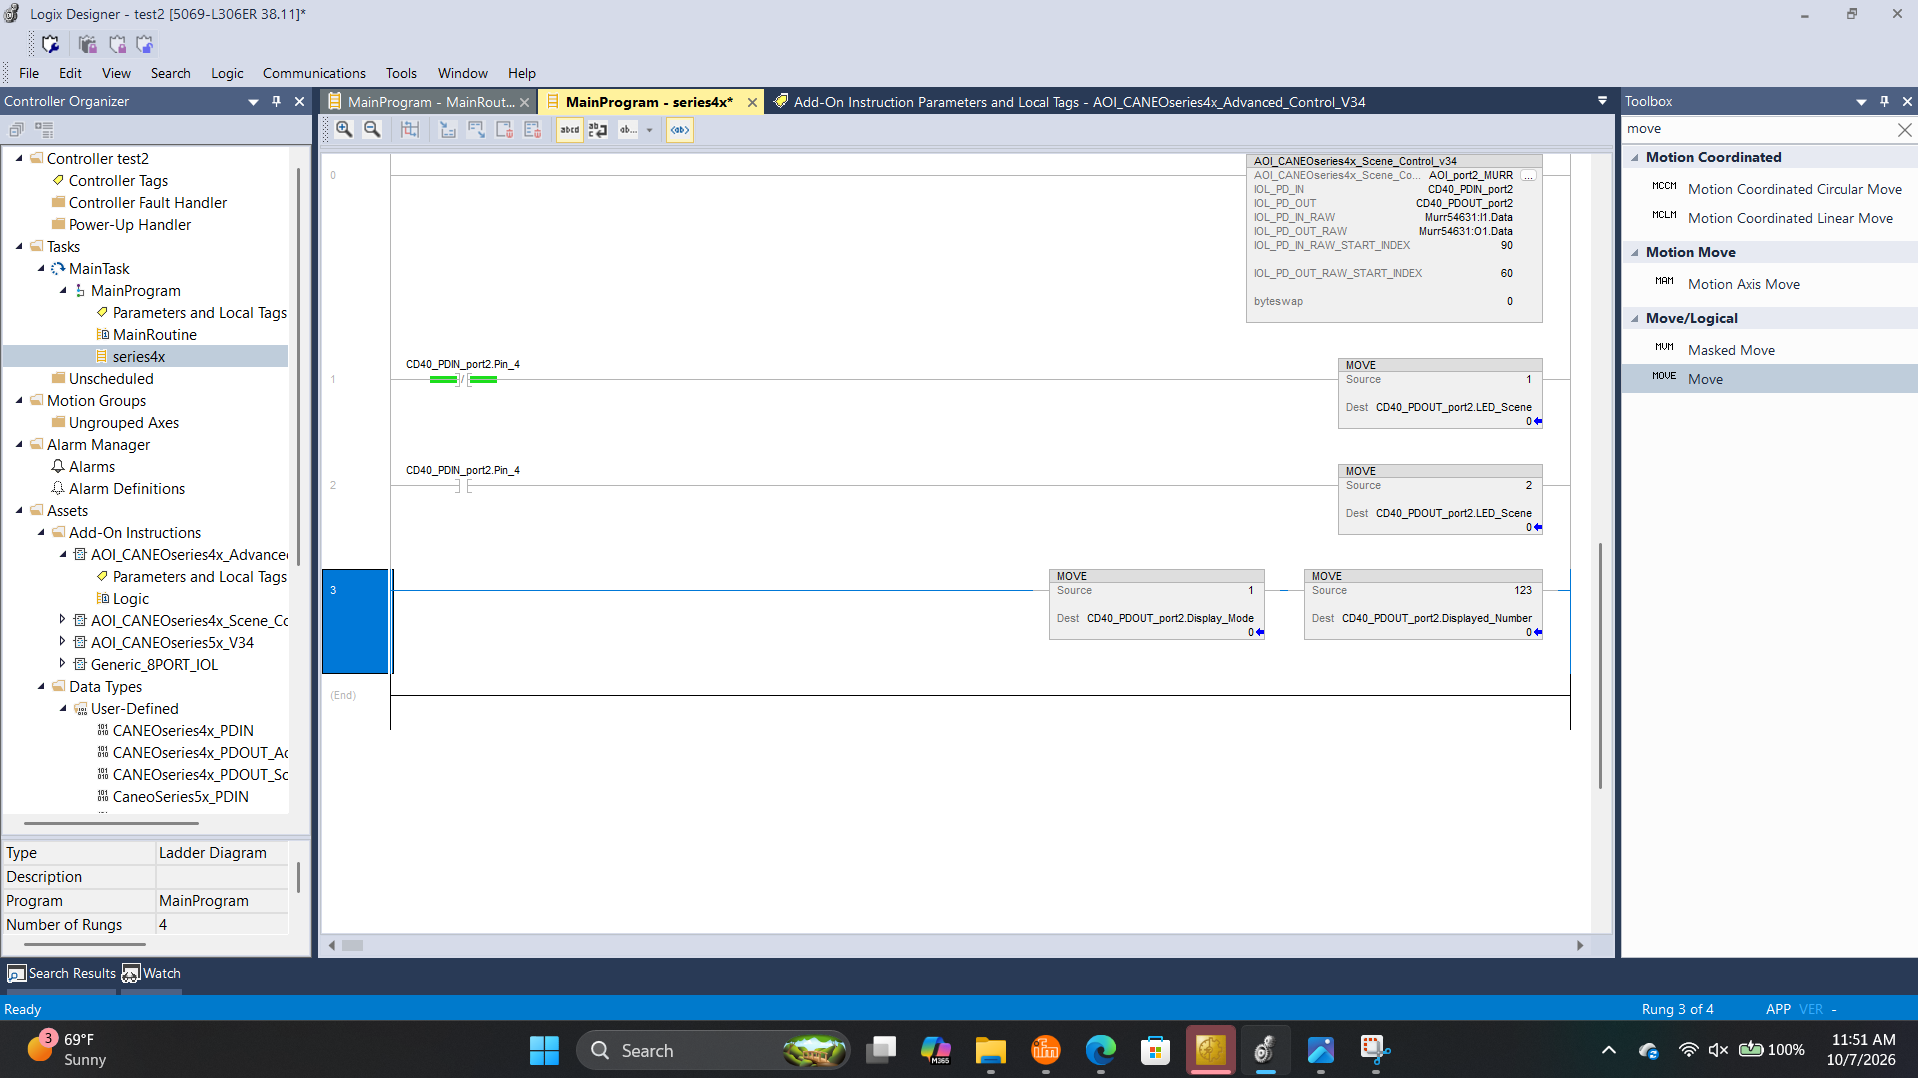
- Rung 0 — calls
AOI_CANEOseries4x_Scene_Control_v34. It must be scanned on every cycle, so leave it unconditional. - Rung 1 — while the OUT pin is off (
XIO CD40_PDIN_port2.Pin_4),MOVE 1intoLED_Scene— scene 1 is active. - Rung 2 — while the OUT pin is on (
XIC CD40_PDIN_port2.Pin_4),MOVE 2intoLED_Scene— scene 2 is active. - Rung 3 — sets
Display_Modeto1(show the number) andDisplayed_Numberto123.
To show text instead, set Display_Mode to 2 and write up to 4 characters to Text.
8. Usage example — Advanced control
The ladder logic below lights the whole LED ring green, turns it red while the OUT pin is on, and writes AAAA to the display.
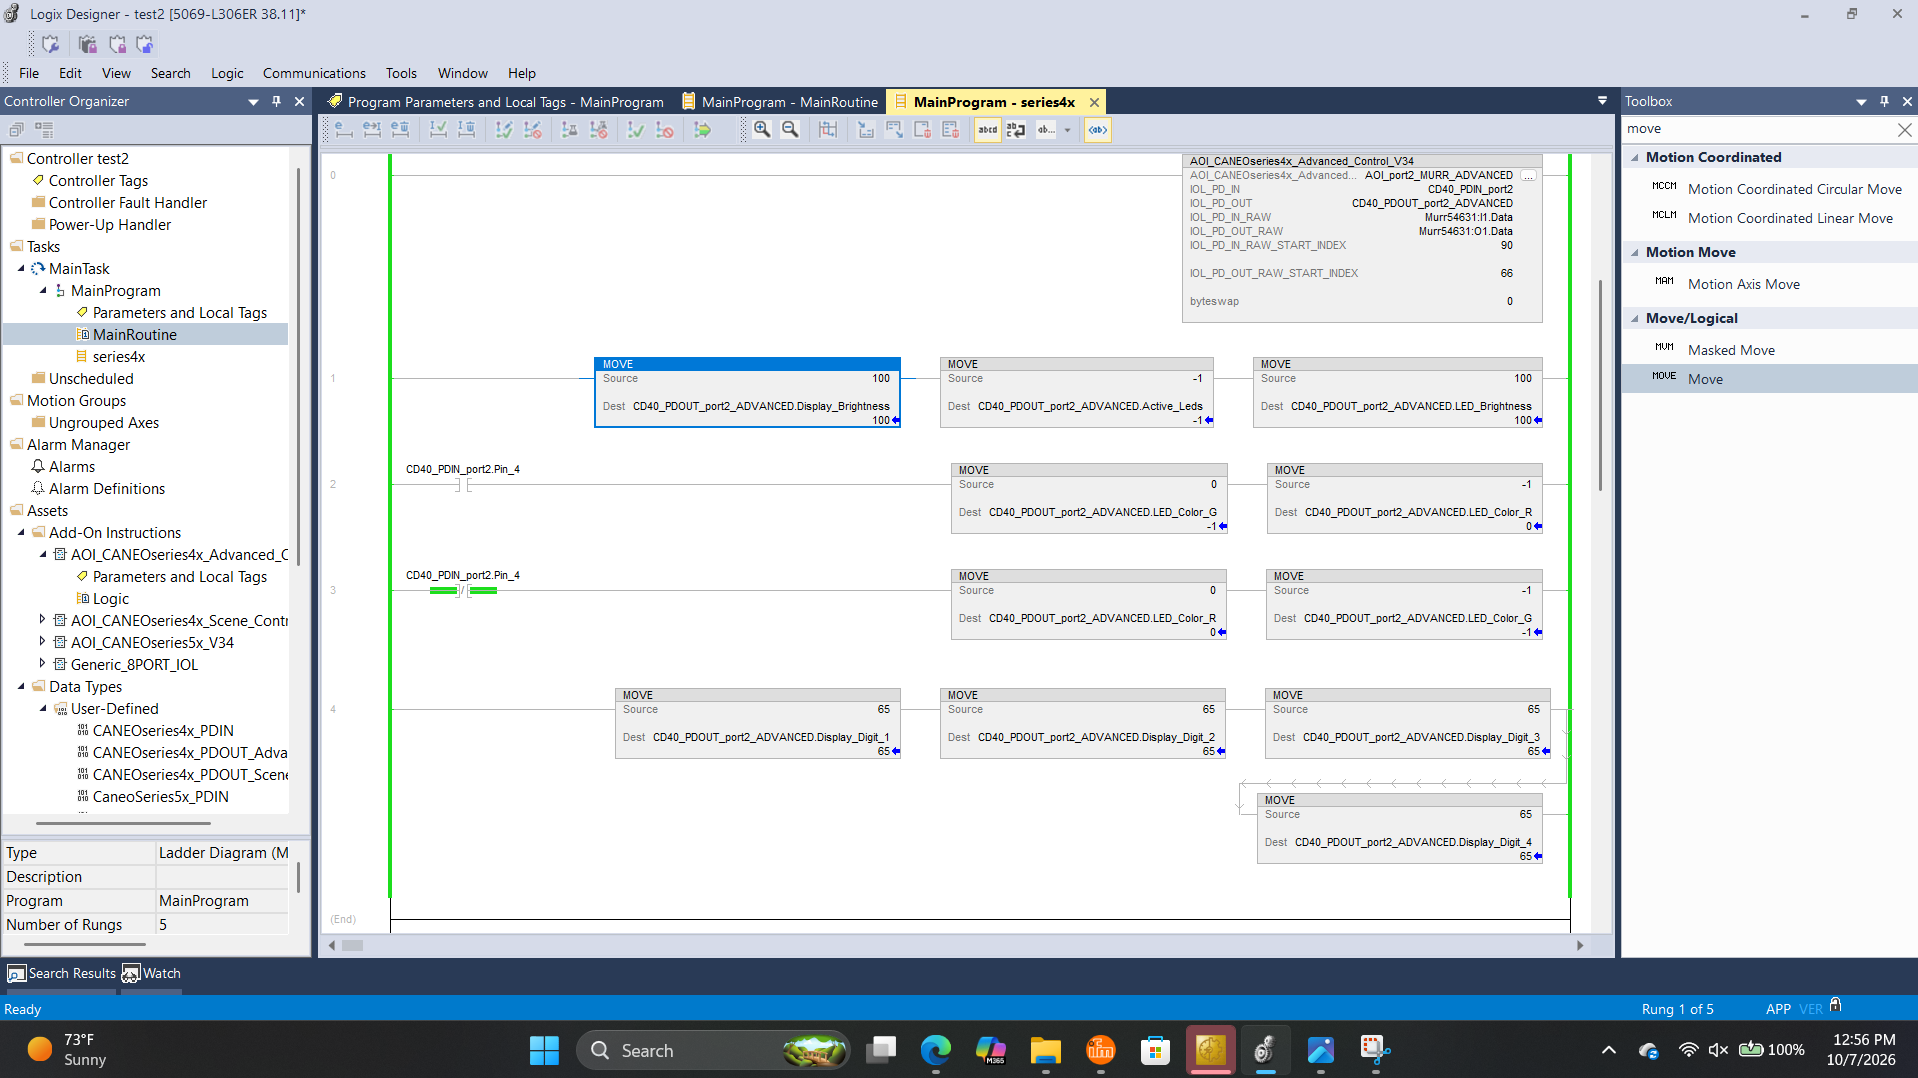
- Rung 0 — calls
AOI_CANEOseries4x_Advanced_Control_V34with its own output tag,CD40_PDOUT_port2_ADVANCED. Leave it unconditional. - Rung 1 — sets
Display_Brightnessto100,Active_Ledsto-1(all 16 LEDs on), andLED_Brightnessto100. - Rung 2 — while the OUT pin is on (
XIC CD40_PDIN_port2.Pin_4), setsLED_Color_Gto0andLED_Color_Rto-1(255) — the ring is red. - Rung 3 — while the OUT pin is off (
XIO CD40_PDIN_port2.Pin_4), setsLED_Color_Rto0andLED_Color_Gto-1(255) — the ring is green. - Rung 4 — writes
65(the ASCII code forA) toDisplay_Digit_1throughDisplay_Digit_4, so the display showsAAAA.
To blink or animate the ring, write an effect number to LED_Effect and a speed to Effect_Frequency.
9. Using integer arrays and an IO-Link master AOI
Some IO-Link masters, such as the IFM AL1322, import their data as an INT array instead of a SINT array, and some come with their own AOI that pulls one port's data into a separate array. The CANEO series4x AOIs expect SINT arrays, so convert with a CPS instruction on the way in and back on the way out:
- The master manufacturer's AOI (if any) extracts the port's data into its own array.
CPScopies the input array into aSINTarray forIOL_PD_IN_RAW.- The CANEO series4x AOI runs, with both start indexes set to
0because the arrays already hold only that port's data. CPScopies theSINTarray fromIOL_PD_OUT_RAWback into the master's output array.
Set byteswap to 1 for masters that swap bytes, such as IFM. For a full walkthrough with screenshots, see step 7 of the CANEO series5x + Allen-Bradley guide. The same steps apply to the series4x.
Tested IO-Link masters
The AOIs were created and tested with the following IO-Link masters:
- MURR IMPACT67 Pro E DIO8 IOL8 M12L 5P (54631)
- IFM AL1322 (byte swap enabled — see step 9)
- SICK SIG300
Other IO-Link masters on EtherNet/IP should work as long as you set the correct start indexes and byteswap value for that master.
Reference
- CANEO series4x Process Data: series4x Process Data
- CANEO series4x LED (and Display) Control: series4x LED Control
- CANEO series4x LED Scenes and Effects: series4x LED Scenes
- CANEO series4x Display Content: series4x Display Content
Download: Add-On Instructions
Download the CAPTRON Add-On Instructions used in this guide. The zip contains both AOIs — CANEOseries4x_Scene_Control_v34_AOI.L5X and CANEOseries4x_Advanced_Control_V34_AOI.L5X — and each one includes its data types. Unzip it and import the .L5X file you need as described in step 1.