smartLED Trainer Guide
Introduction
This document walks through setting up the CAPTRON Smart LED trainer kit. The kit includes everything needed to connect LED strips and buttons to a PLC or PC over MQTT. This guide is written for control engineers and integrators who are new to MQTT. Providing a deep understanding of our hardware, MQTT, and how to implement the Smart LED's.
By following the walk through the User will be able to:
- Power on and configure the full hardware stack
- Set up an MQTT broker and communicate with the controller
- Publish messages to control LED strips and read button inputs
- Understand how to scale from a trainer/demo to a production deployment
Overview of Hardware
SEH201 (MQTT Controller)
The provided Controller SEH201 is the communication driver for LED strips and buttons. This communication is done over MQTT, a TCP/IP based messaging protocol commonly used in IOT applications. CAPTRON offers two MQTT controllers. The SEH201 has an M8 plug for the SMC47 series buttons. The SEH101 does not have an m8 plug.
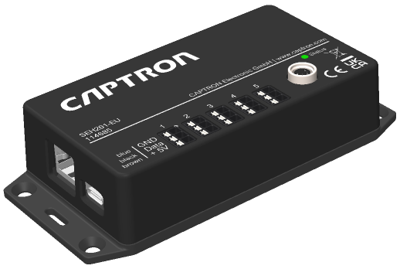
Important features of SEH201 and SEH101
- Ethernet MQTT communication
- Power over Ethernet (PoE, ~48 VDC) — supports up to 8W of LED output
- USB-C (~5 VDC) — alternative power input, 15W of LED output
Limitations of SEH201/SEH101
- Maximum of 5 LED strips per controller
- Maximum of 5 daisy-chained SMC47 buttons per controller (SEH201 only)
- If you need more than 5 buttons, refer to the SEH11-2M2 (40 buttons max)
- Maximum 3 meters of active LEDs across all strips on a controller
SLS10 (LED Strip)
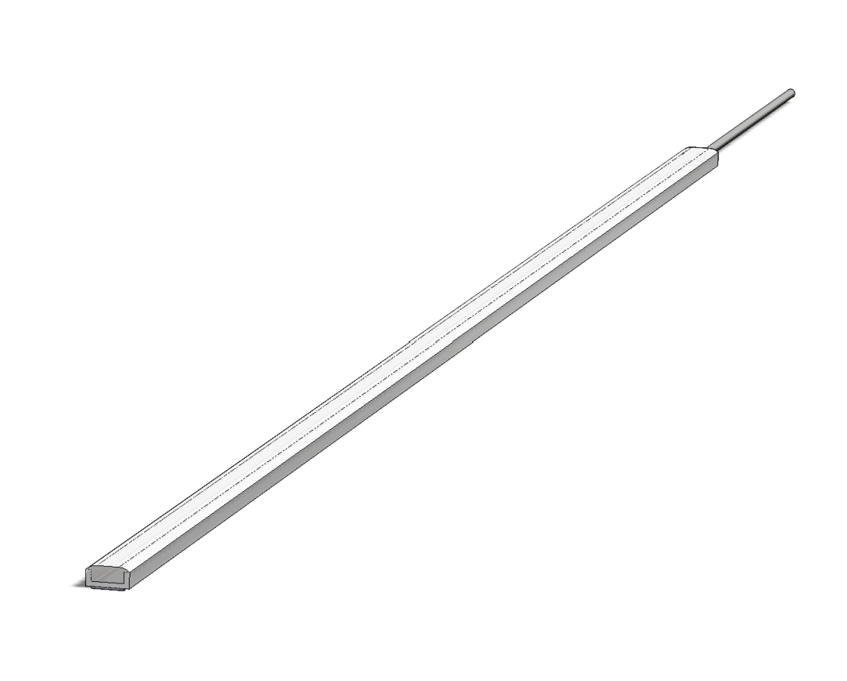
Important features of SLS10
- 60 individually addressable RGB LEDs per meter
- IP67 and IK07
- Available in lengths of 980, 2050, 3100, and 5000 mm
- Lead cable 4000 mm between the strip and the controller
SMC47 (Touch Buttons)
The buttons provided are capacitive touch buttons that are daisy chainable. They also have a 7-segment display that is controlled via MQTT. Commonly used in pick to light applications.
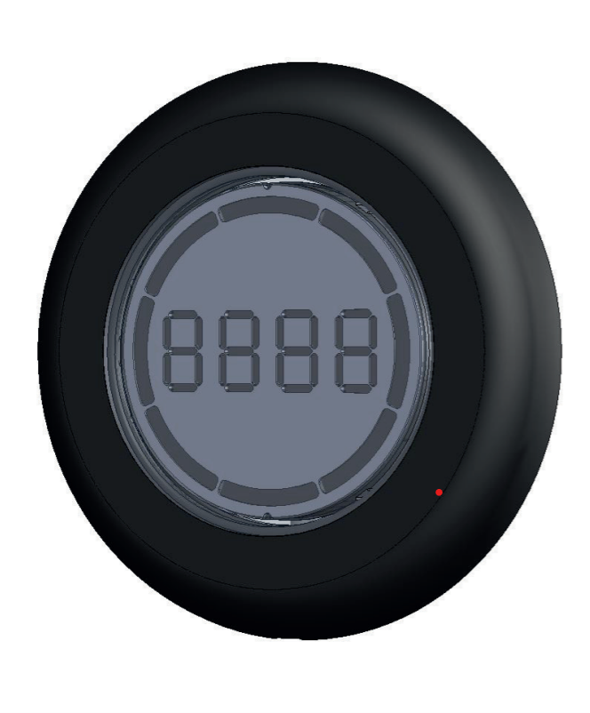
Important features of SMC47
- RGB illuminated ring (8 programmable colors)
- 4-digit 7-segment display
- Up to 5 buttons daisy-chained per SEH201 over a single M8 4-pin cable
- 24 V DC supply (16.8-32 V range), 0.5 W per button
TB-6293 (Industrial PC)
The TB-6293 is an industrial computer that will act as our MQTT broker.
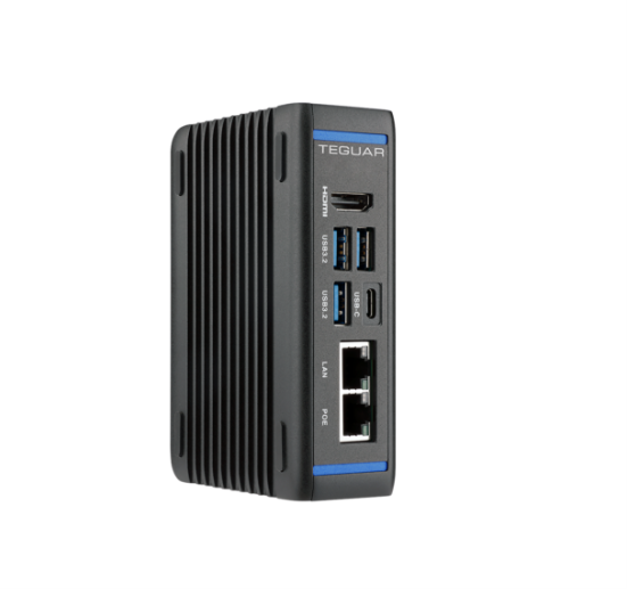
Important Features of Scout TB-6293
- MQTT Broker
- Power over ethernet port, PoE
- Windows 11 IOT
MQTT Overview
MQTT stands for Message Queuing Telemetry Transport. It is a lightweight messaging protocol that is designed to provide efficient, reliable communication between devices in IoT (Internet of Things) and other resource-constrained environments. MQTT follows a publish/subscribe model, where publishers send messages to a broker that acts as an intermediary, and subscribers receive those messages from the broker. This allows for efficient distribution of messages to multiple recipients, without requiring each device to maintain a direct connection to every other device.
MQTT is designed to be highly scalable, flexible, and easy to implement on a wide range of devices, from simple microcontrollers to powerful servers. It is widely used in IoT applications, where devices need to communicate with each other over constrained networks and with limited processing power and memory resources.
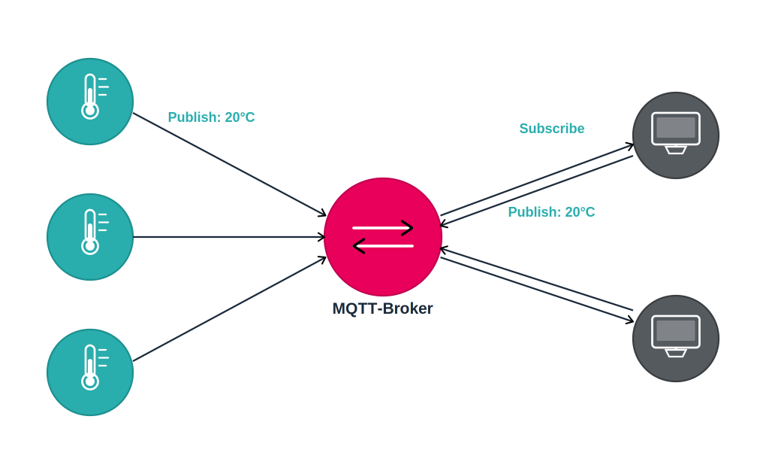
MQTT Architecture
In MQTT, a device that sends a message is called a publisher and a device that listens for messages is called a subscriber. Publishers send their messages to a topic, and subscribers tell the broker which topics they want to hear about; the broker handles the routing in between. The publisher does not need to know who is listening, and the subscriber does not need to know who sent the message. That decoupling is the whole point of the model: two devices can communicate without ever having a direct connection to each other, and new subscribers (loggers, dashboards, a second PLC) can be added at any time without changing anything on the publisher side.
Publish/Subscribe Model
Publisher
A publisher is any client that sends data to the broker. MQTT requires that publishers provide a topic "the address" and a payload "the data".
Subscriber
A subscriber is any client that is listening to incoming payloads, by listening at specific topics "the address". It does this by telling the broker what topics it wants to listen to and can listen to multiple topics at once.
Broker Client Relationship
MQTT decouples direct connections by using a broker. A broker in our case is an industrial PC. The industrial PC hosts the communication path between devices.
The Client can be either a publisher or subscriber. A device or service is considered a client if it uses the broker for communication.
Topics
Topics are the addressing system of MQTT. They tell the broker where a message should go and allows a subscriber to specify what data they are looking for.
A topic is a simple text string organized in levels separated by forward slashes, like a file path. For example:
conveyor/sensors/sensor1/temperature
Typos route to a topic that nothing is subscribed to, and the message is silently dropped — no error, no warning. This is the most common debugging trap.
Publishers send a message to a specific topic. Subscribers tell the broker which topics they want to receive. When a new message is published to a topic, the broker forwards it to every client subscribed to that topic.
Think of it like a library. The broker is the building. The topic is the shelf and position -- it tells you exactly where to find (or place) a specific book. A publisher puts a book on the shelf. A subscriber is then told when a new book is placed.
Wild Cards
Wild Cards allow clients to subscribe to broad topics. There are two annotations + and #. This feature only works for subscribers.
- allows subscribers to address a single level. For example,
conveyor/sensors/+/temperature. Would allow a subscriber to receive all messages from sensors with their temperatures.
# wild card for subscribing messages to every topic below that point. For example, if a subscriber is subscribed to conveyor/sensors/#. The subscriber will be listening to every topic below "sensors."
Payloads
The payload is the actual content of the message -- the data that the topic is delivering. If the topic is the address on an envelope, the payload is the letter inside.
MQTT itself does not care what is on the payload. It treats the payload as raw bytes and forwards it from publisher to subscriber unchanged. That means the format -- plain text, JSON, a single number, binary data. All will work with MQTT. The SEH devices use JSON formatting. The SEH controllers use case sensitive payloads.
QoS stands for Quality of Service and defines the reliability of message delivery. QoS is negotiated per-hop: once on the publisher-to-broker leg, and again on the broker-to-subscriber leg. A publisher publishing at QoS 2 does not guarantee that subscribers receive at QoS 2 -- each subscriber sets its own QoS level when it subscribes.
- QoS 0 – (at most once). Fire and forget. Does not guarantee delivery.
- QoS 1 – (at least once). Guarantees delivery by repeatedly sending the message until acknowledged but can cause duplicates.
- QoS 2 – (exactly once). Uses a 4-step handshake. Guarantees the message is delivered once and only once.
Last Will
A Last Will and Testament (LWT) is a message that a client registers with the broker when it first connects. If that client later disconnects unexpectedly -- power loss, network drop, crash -- the broker publishes the LWT message on the client's behalf to a topic the client specified. This is how subscribers find out a device has gone offline without having to poll it. Important for monitoring devices in the field.
Why MQTT?
- MQTT works over standard IT networks (no proprietary field or gate way). Reduces hardware
- Supported natively by the majority of modern PLC's
- Decouples direct connection, SEH controllers can be controlled by multiple sources
Disadvantages
- MQTT requires broker usually hosted on Cloud or Industrial PC, while other protocols are directly connected. Broker is a single point of failure.
- No schema enforcement. Meaning MQTT allows for malformed data, two clients can object to how data is formatted.
MQTT resources:
- https://www.hivemq.com/resources/download-mqtt-ebook/
- https://aws.amazon.com/what-is/mqtt/
- https://mosquitto.org/
Smart LED architecture
The architecture for our trainer follows as such. The industrial computer (TB-6293) acts as our MQTT broker, broking messages between the PLC and SEH201. For this trainer there are two clients, SEH201 and PLC. The PLC publishes specific topics and specifies the output (colors/text) of LED strip and the button. The Controller subscribes to specific topics. Then SEH201 controls the LED strips and buttons based on the topic/payload.
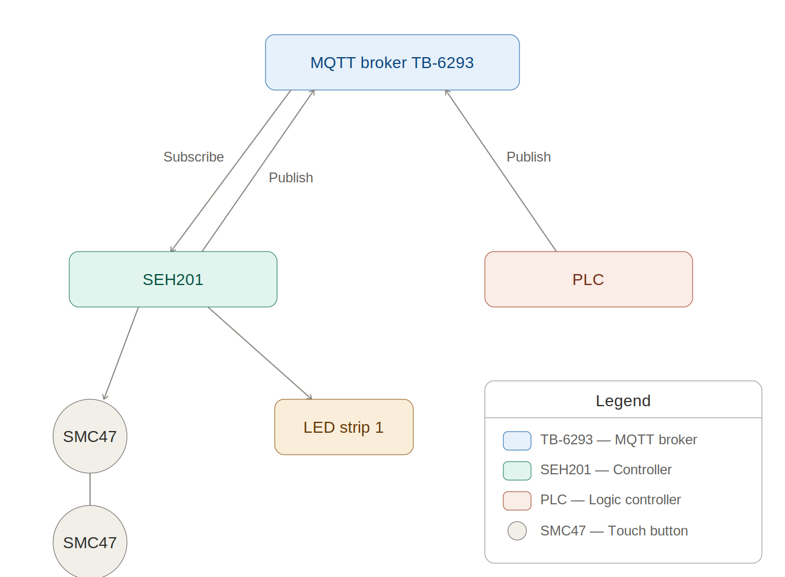
Synopsis
- PLC sends messages out
- Broker receives messages and topics
- SEH controller listens to specific topics, responds to the topics by outputting colors/effects on LED strips and touch buttons.
Trainer Walk Through
This walkthrough covers setting up the industrial PC as an MQTT broker, configuring the SEH201, and publishing your first message.
Prerequisites:
- Monitor
- HDMI cord
- Keyboard
- Mouse
Powering On Trainer
- Plug in the trainer using the power cord.
- Connect the monitor, mouse, and keyboard.
- Power on the trainer by pressing the small button next to the DC-in outlet on the computer.
Changing the Subnet
The first step is to change the PC's subnet to match the SEH201's default IP address, which is 169.254.101.201.
Before the controller can talk to the broker, we first have to get onto it to change its settings. The SEH201 ships on the link-local address 169.254.101.201, so the PC has to be on that same 169.254.101.x subnet to reach the controller's built-in webserver.
- Go to Settings → Network & Internet → Ethernet.
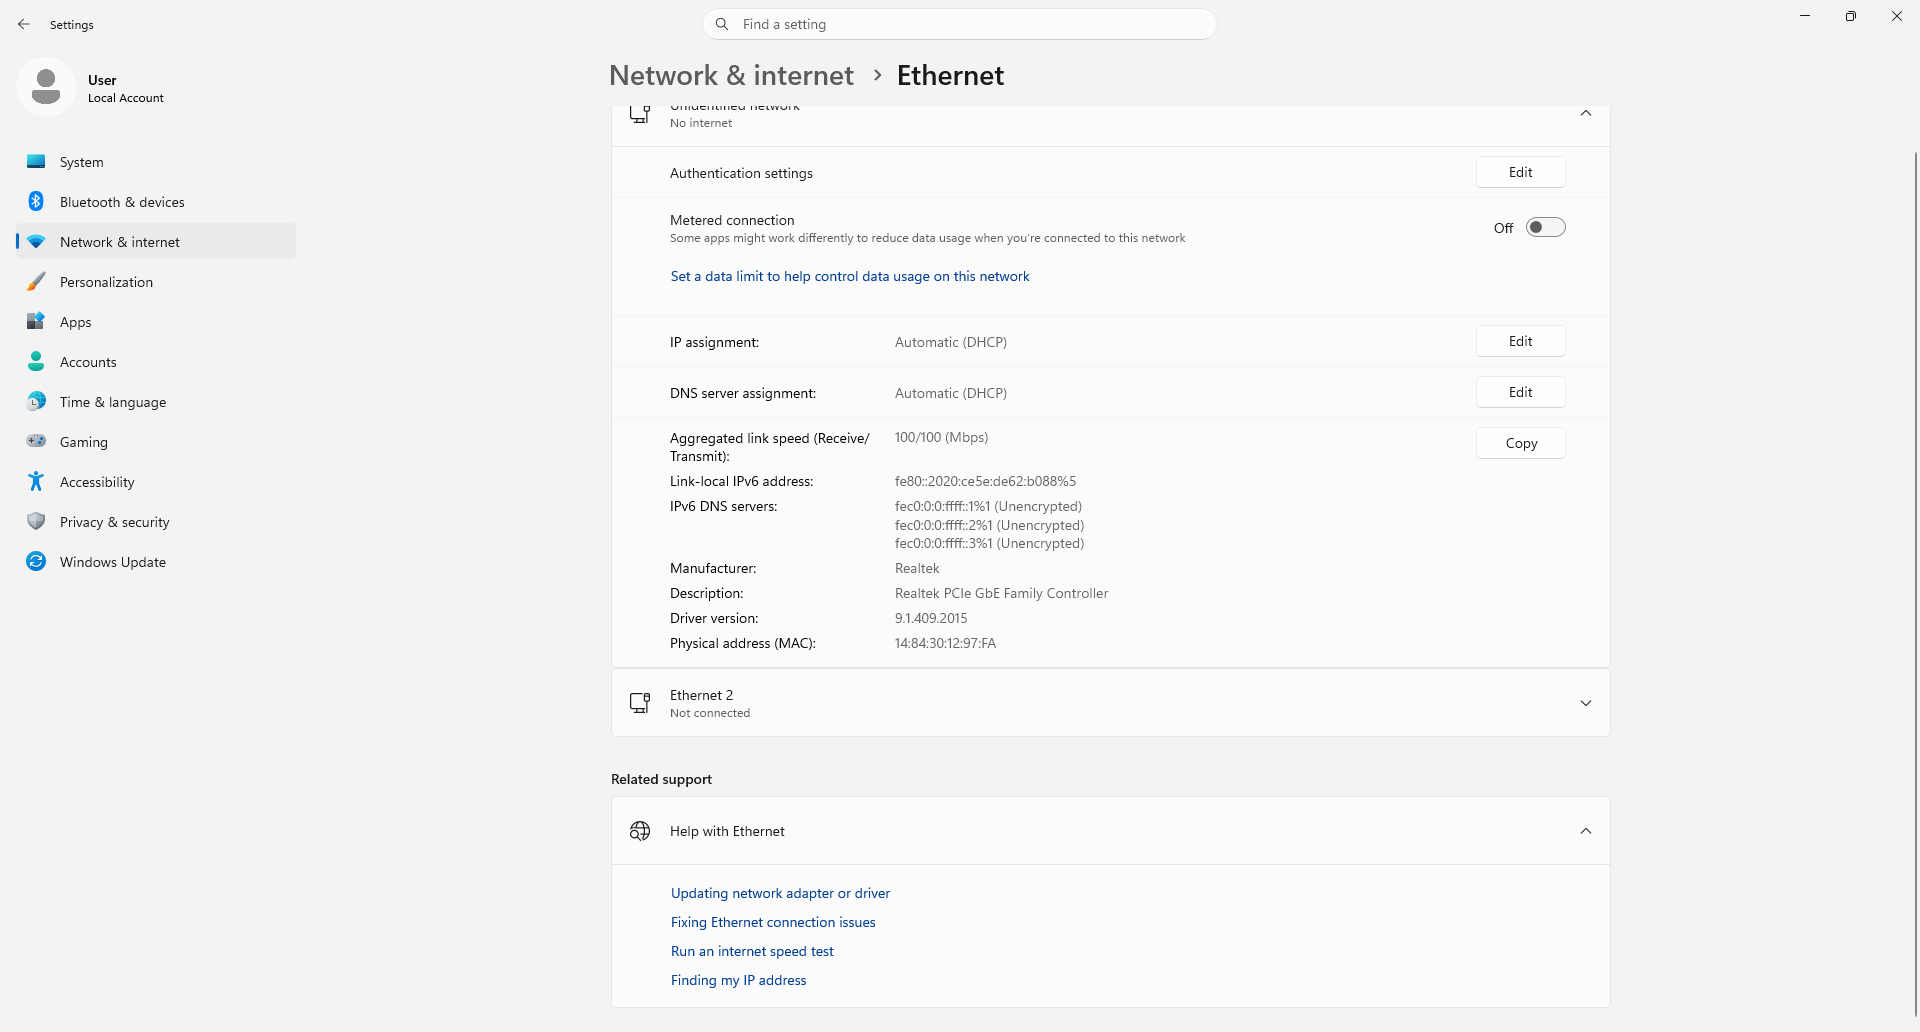
- Next to IP assignment, click Edit.
- Change Automatic (DHCP) to Manual.
- Toggle IPv4 on, and enter:
| Field | Value |
|---|---|
| IP address | 169.254.101.202 |
| Subnet mask | 255.255.255.0 |
| Gateway | 169.254.101.1 |
| Preferred DNS | 8.8.8.8 |
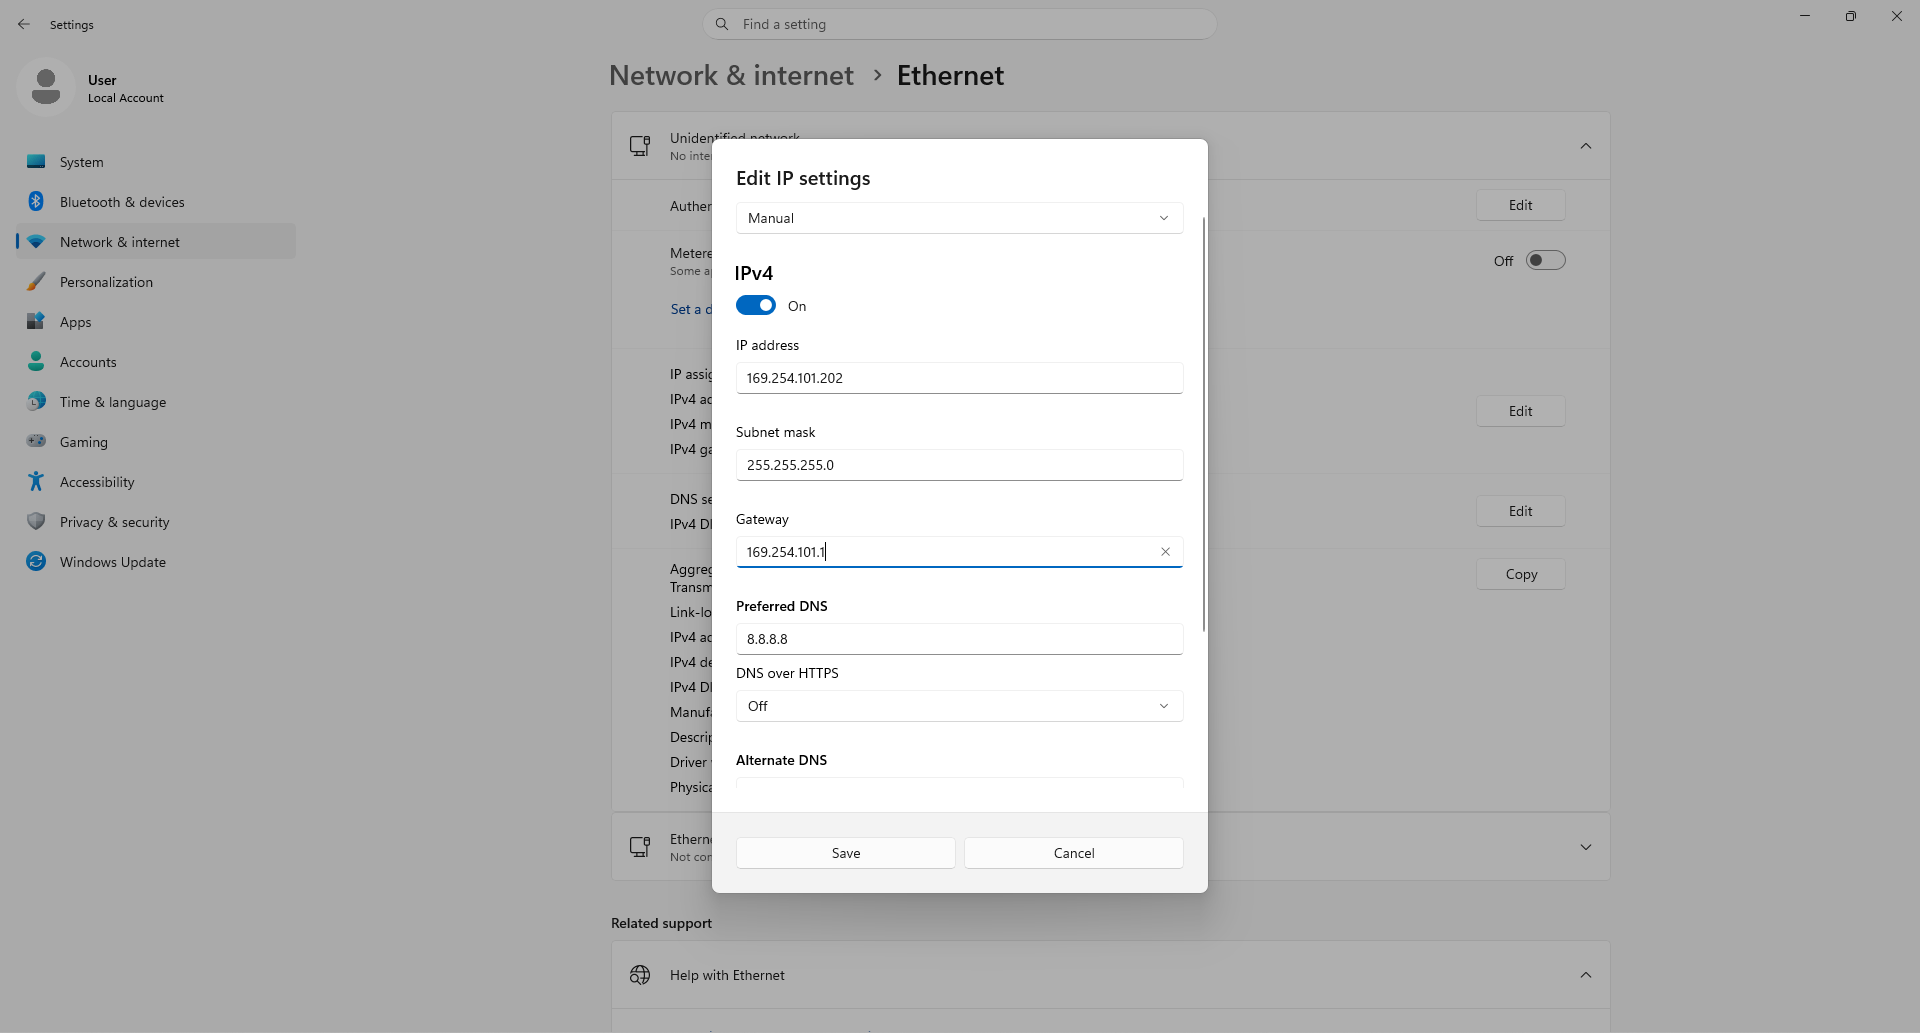
- Click Save.
This 169.254.101.x address is only to reach the controller's default address and configure it. In the next section you'll move the SEH201 onto your production subnet (e.g. 192.168.1.x). After that, you'll come back here and set the PC to its production IP — 192.168.1.112, the same address the broker config binds to later.
Configuring the SEH201
With the PC on the 169.254.101.x subnet, we can now open the SEH201's built-in webserver and point the controller at our broker.
Open a web browser and navigate to http://169.254.101.201 to reach the controller.
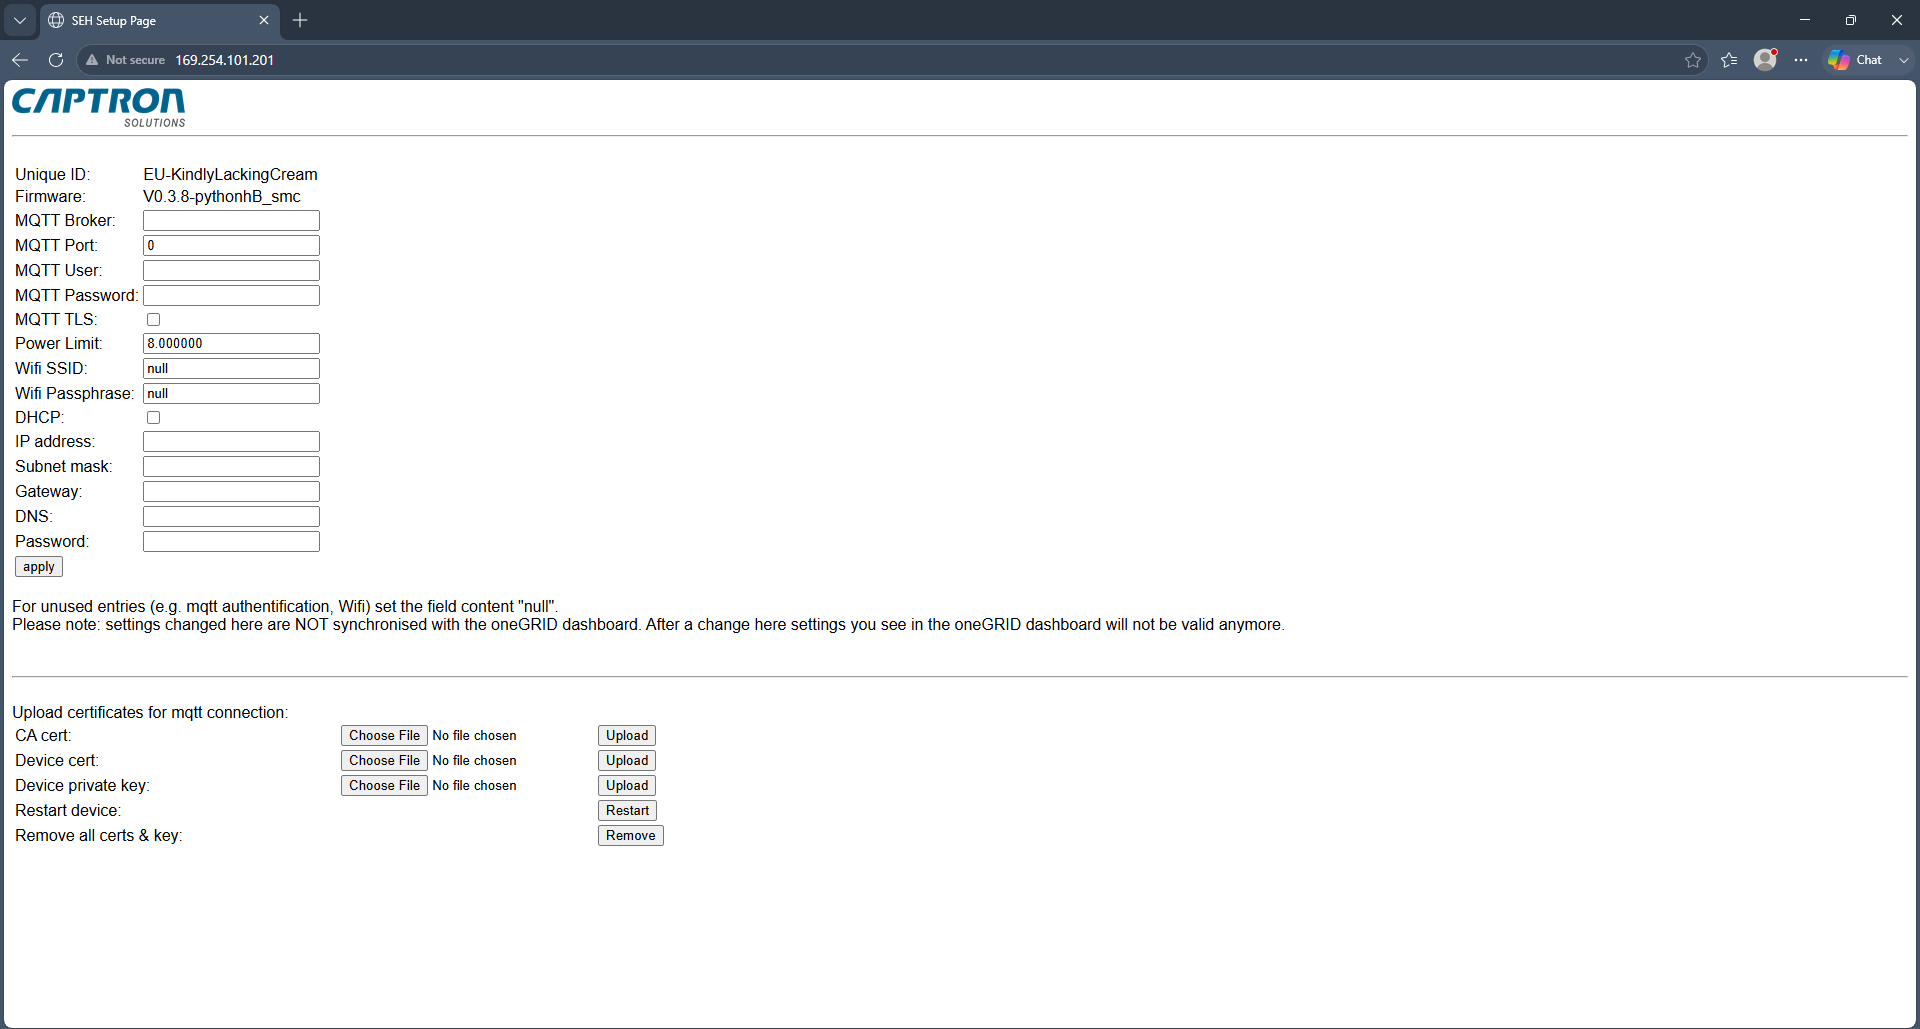
To change the controller's settings you must first power-cycle the controller (unplug its power/PoE, then plug it back in), and the configuration must be saved within 45 seconds of the controller booting. Miss the window and the controller ignores the change — just power-cycle and try again.
The page has two portions, and it's important to understand which is which:
- Top portion — broker settings (MQTT Broker, MQTT Port, …). This tells the controller where the broker lives. Set MQTT Broker to the IP address of the industrial PC you'll use in production — for this example,
192.168.1.112. - Second portion — the controller's own network settings (DHCP, IP Address, Subnet). This is the controller's own identity on the network. Set its IP Address to the same subnet as your IPC — for this example,
192.168.1.26. Use whatever address fits your existing architecture.
The MQTT Broker field is the address the controller connects out to (your PC). The IP Address field is the controller's own address. They are two different devices, so they get two different addresses on the same subnet — don't set them the same.
Webserver password: pythonhead22
Enter the following settings:
| Setting | Value |
|---|---|
| MQTT Broker | 192.168.X.XXX — your IPC's IP (e.g. 192.168.1.112) |
| MQTT Port | 1883 |
| MQTT User | Leave blank |
| MQTT Password | Leave blank |
| MQTT TLS | Leave blank |
| Power Limit | Leave blank |
| Wifi SSID | Leave blank |
| Wifi Passphrase | Leave blank |
| DHCP | Click the checkbox |
| IP Address | 192.168.X.XXX — the controller's IP (e.g. 192.168.1.26) |
| Subnet Mask | 255.255.255.0 |
| Gateway | 192.168.1.1 |
| DNS | 8.8.8.8 |
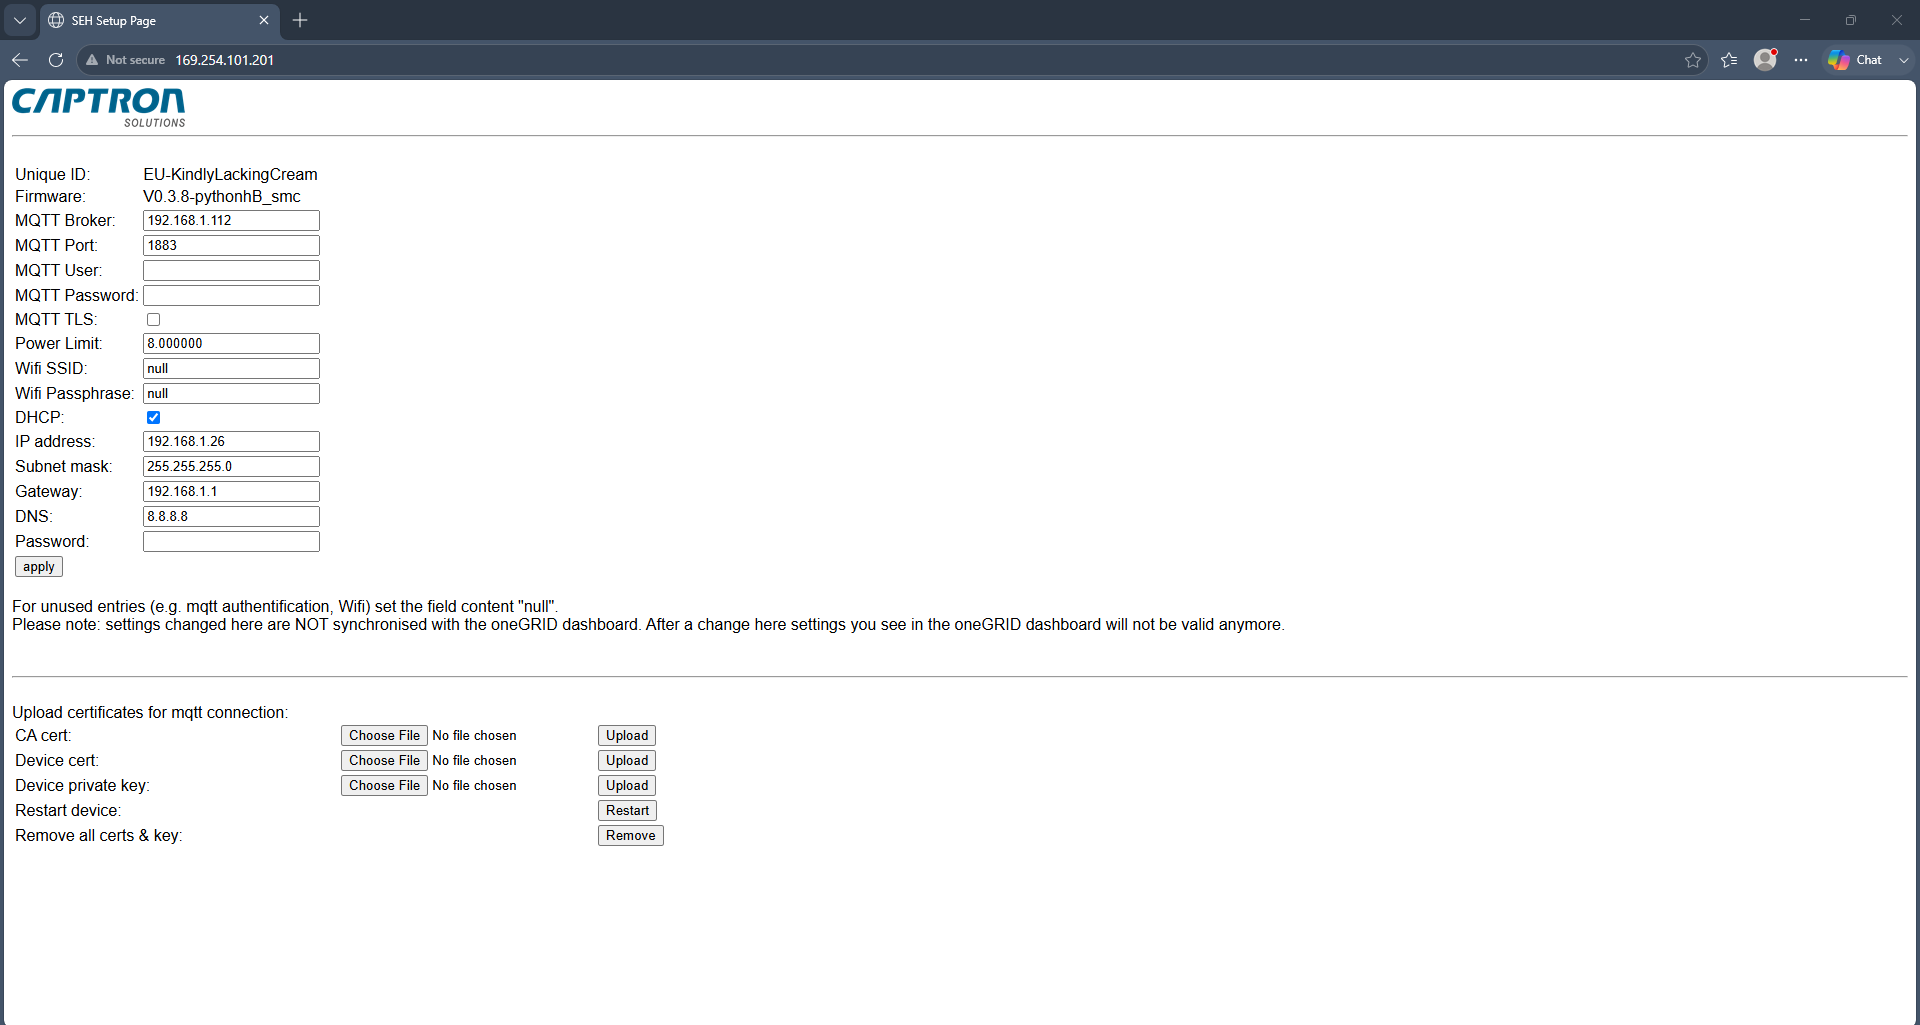
The device needs both entered to operate properly.
1883 is the standard unencrypted MQTT port — it matches the listener 1883 line in the broker config you'll write next. User / Password / TLS are left blank because the broker runs with allow_anonymous true on an isolated trainer network. (In production you'd set credentials here and turn off anonymous access on the broker.)
Confirming it saved: After you enter the password and save, the device resets itself. You'll know the configuration took because you can no longer reach the controller at http://169.254.101.201 — it has moved to its new IP on your production subnet. Your PC is still on 169.254.101.x, so it can't see the controller anymore — which is exactly the signal the change worked.
SEH201 LED Indicator
The SEH201 has an indicator light that reports its connection status at a glance:
| Color | Status |
|---|---|
| Yellow | MQTT connection attempt / no MQTT connection |
| Red | No ethernet/wifi connection |
| Blue | No ethernet/wifi connection |
| Cyan / green-blue | MQTT connection established |
The light stays yellow until the broker is running and the controller connects — you'll watch it turn cyan in Starting the Broker below.
Return the PC to the Production Subnet
The controller now lives on the production subnet (192.168.1.x), but the PC is still on the temporary 169.254.101.x address — so the two can no longer see each other. Move the PC onto the production subnet to rejoin it.
Repeat the Changing the Subnet steps (Settings → Network & Internet → Ethernet → IP assignment → Edit → Manual), this time entering the production values:
| Field | Value |
|---|---|
| IP address | 192.168.1.112 |
| Subnet mask | 255.255.255.0 |
| Gateway | 192.168.1.1 |
| Preferred DNS | 8.8.8.8 |
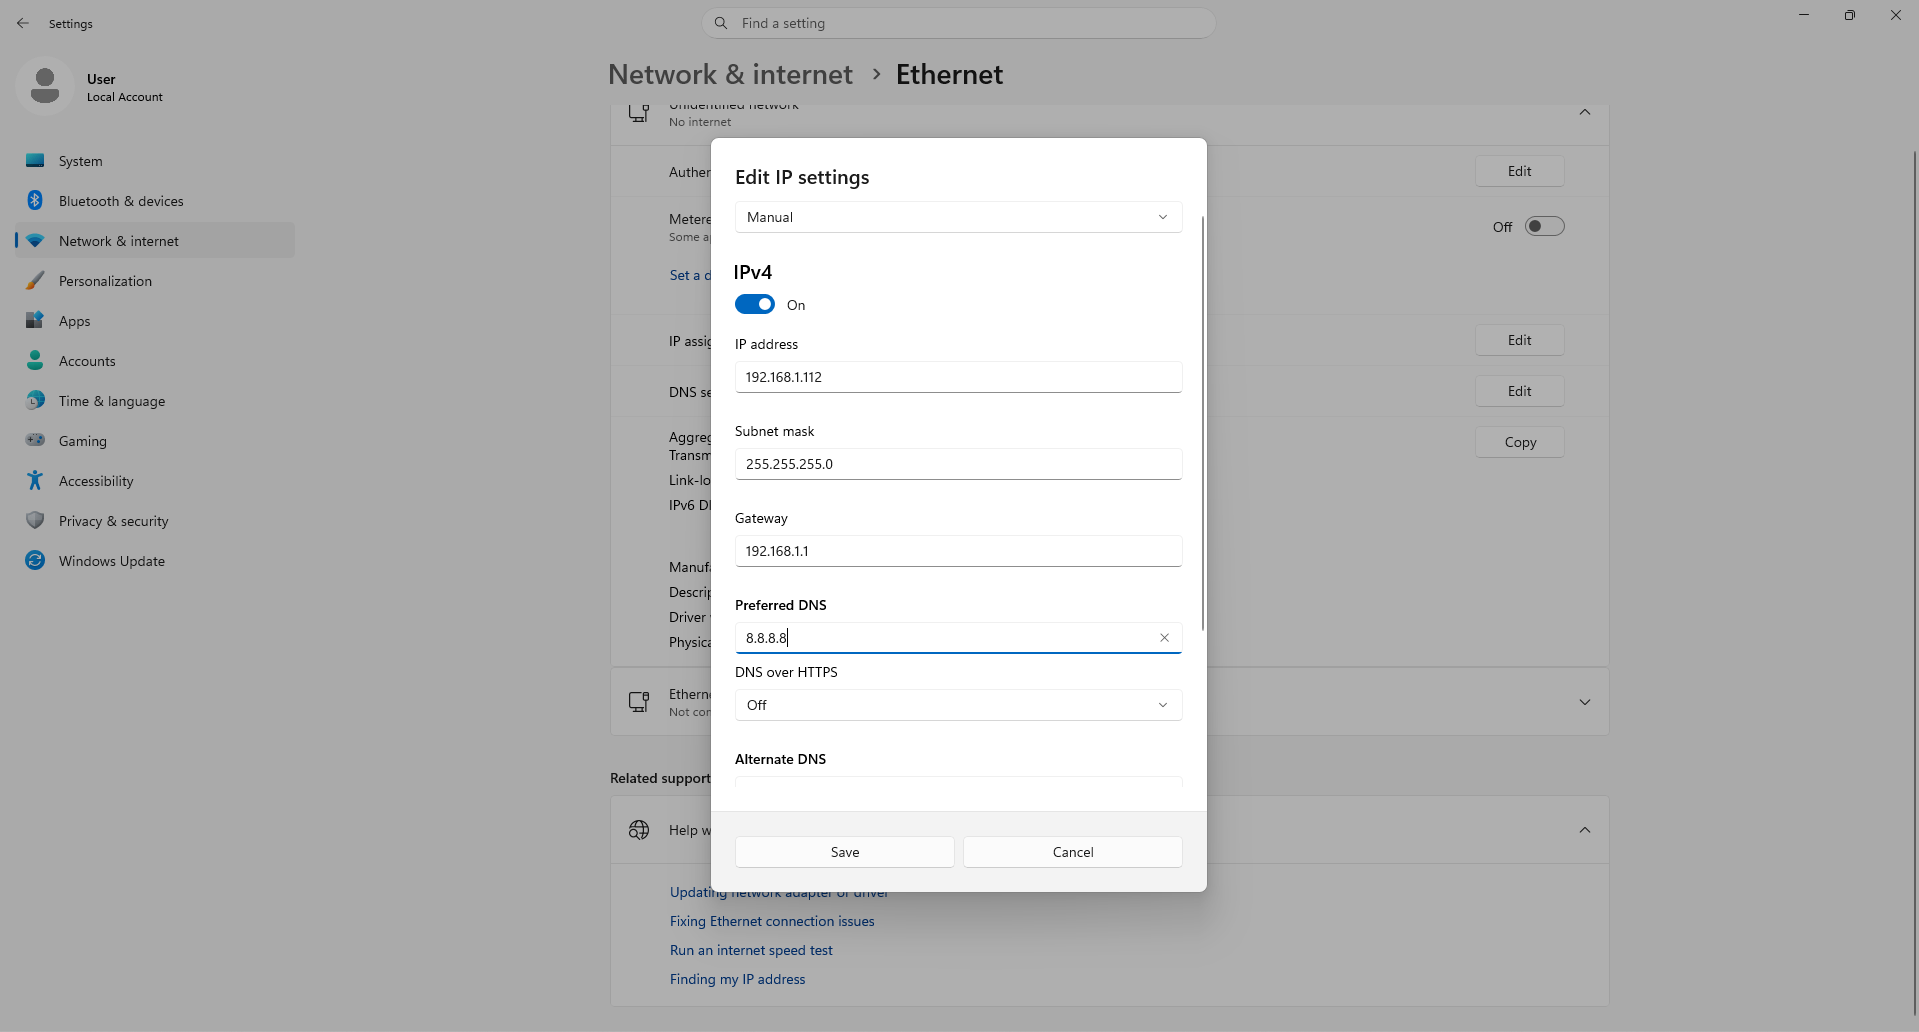
192.168.1.112 is the PC's permanent broker address (the one the broker config binds to in Setting up the MQTT Broker). The controller is at 192.168.1.26; the PC must not reuse that address.
Installing Eclipse Mosquitto
Eclipse Mosquitto is a free, open-source MQTT broker that we'll use throughout this walkthrough.
- Navigate to https://mosquitto.org/ → Download.
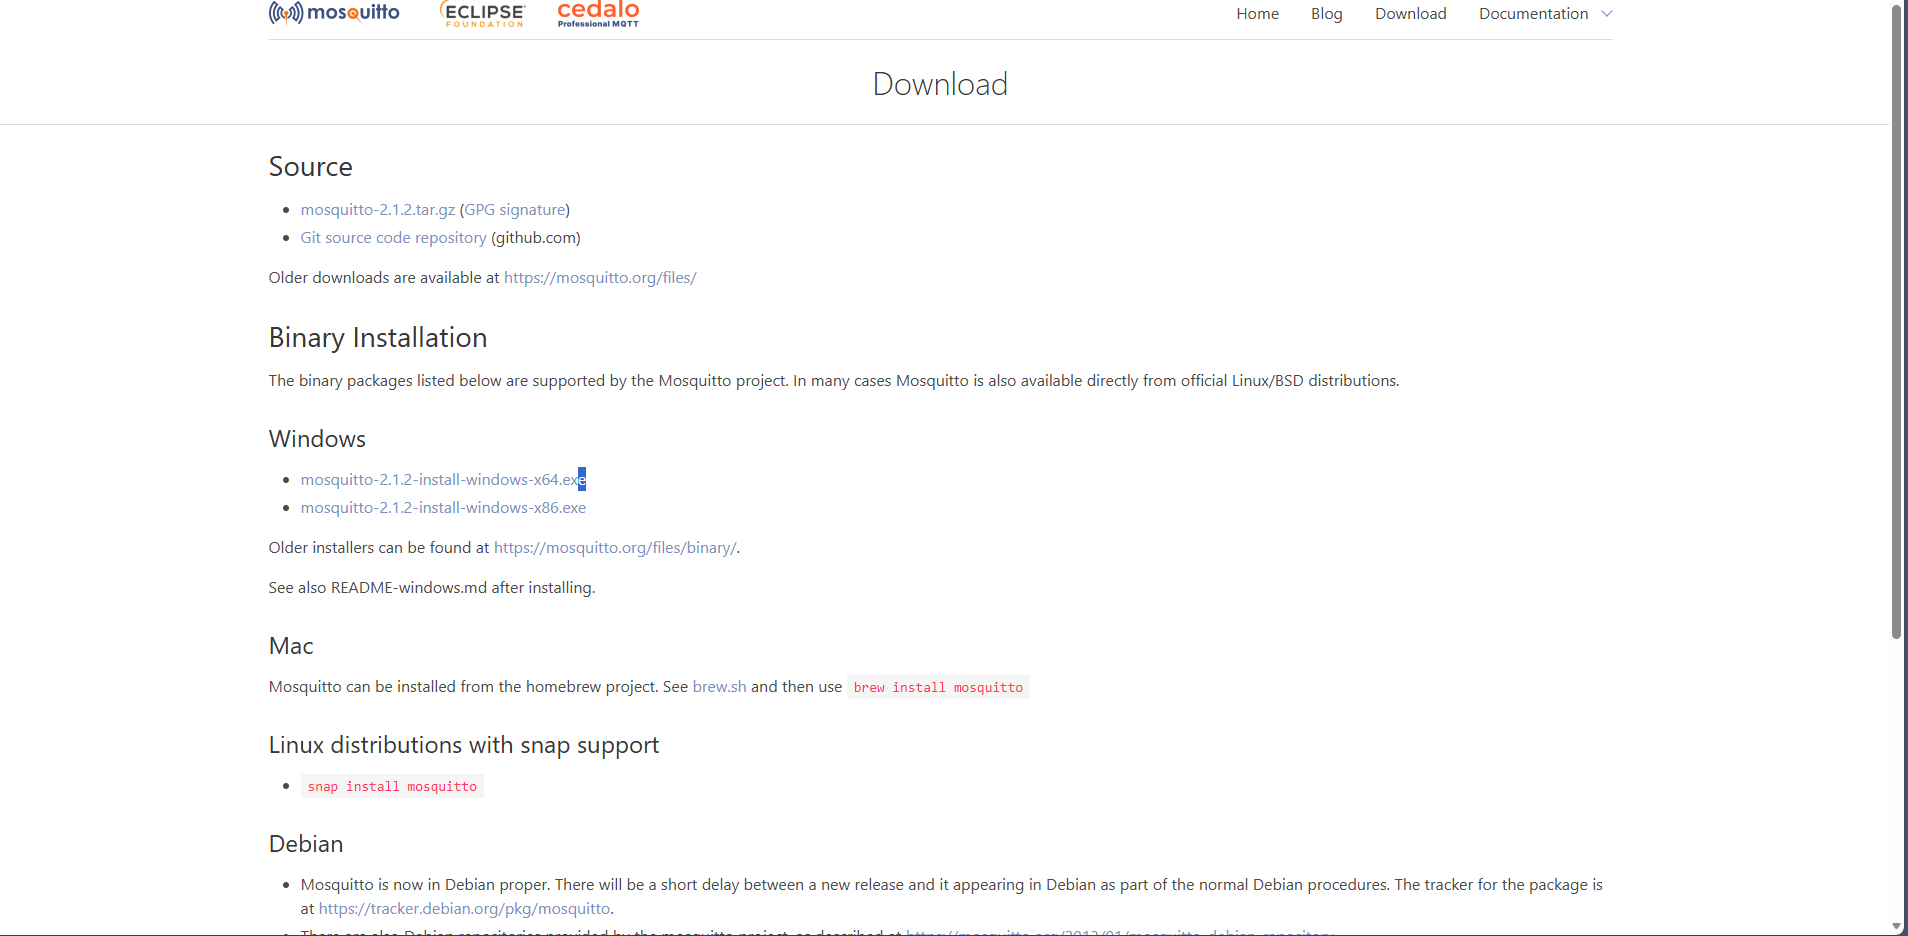
- Download the Windows installer, e.g.
mosquitto-2.1.2-install-windows-x64.exe. - Go to File Explorer → Downloads → double-click the installer.
- Follow the installation setup until Mosquitto is installed. (Default install location:
C:\Program Files\Mosquitto\.)
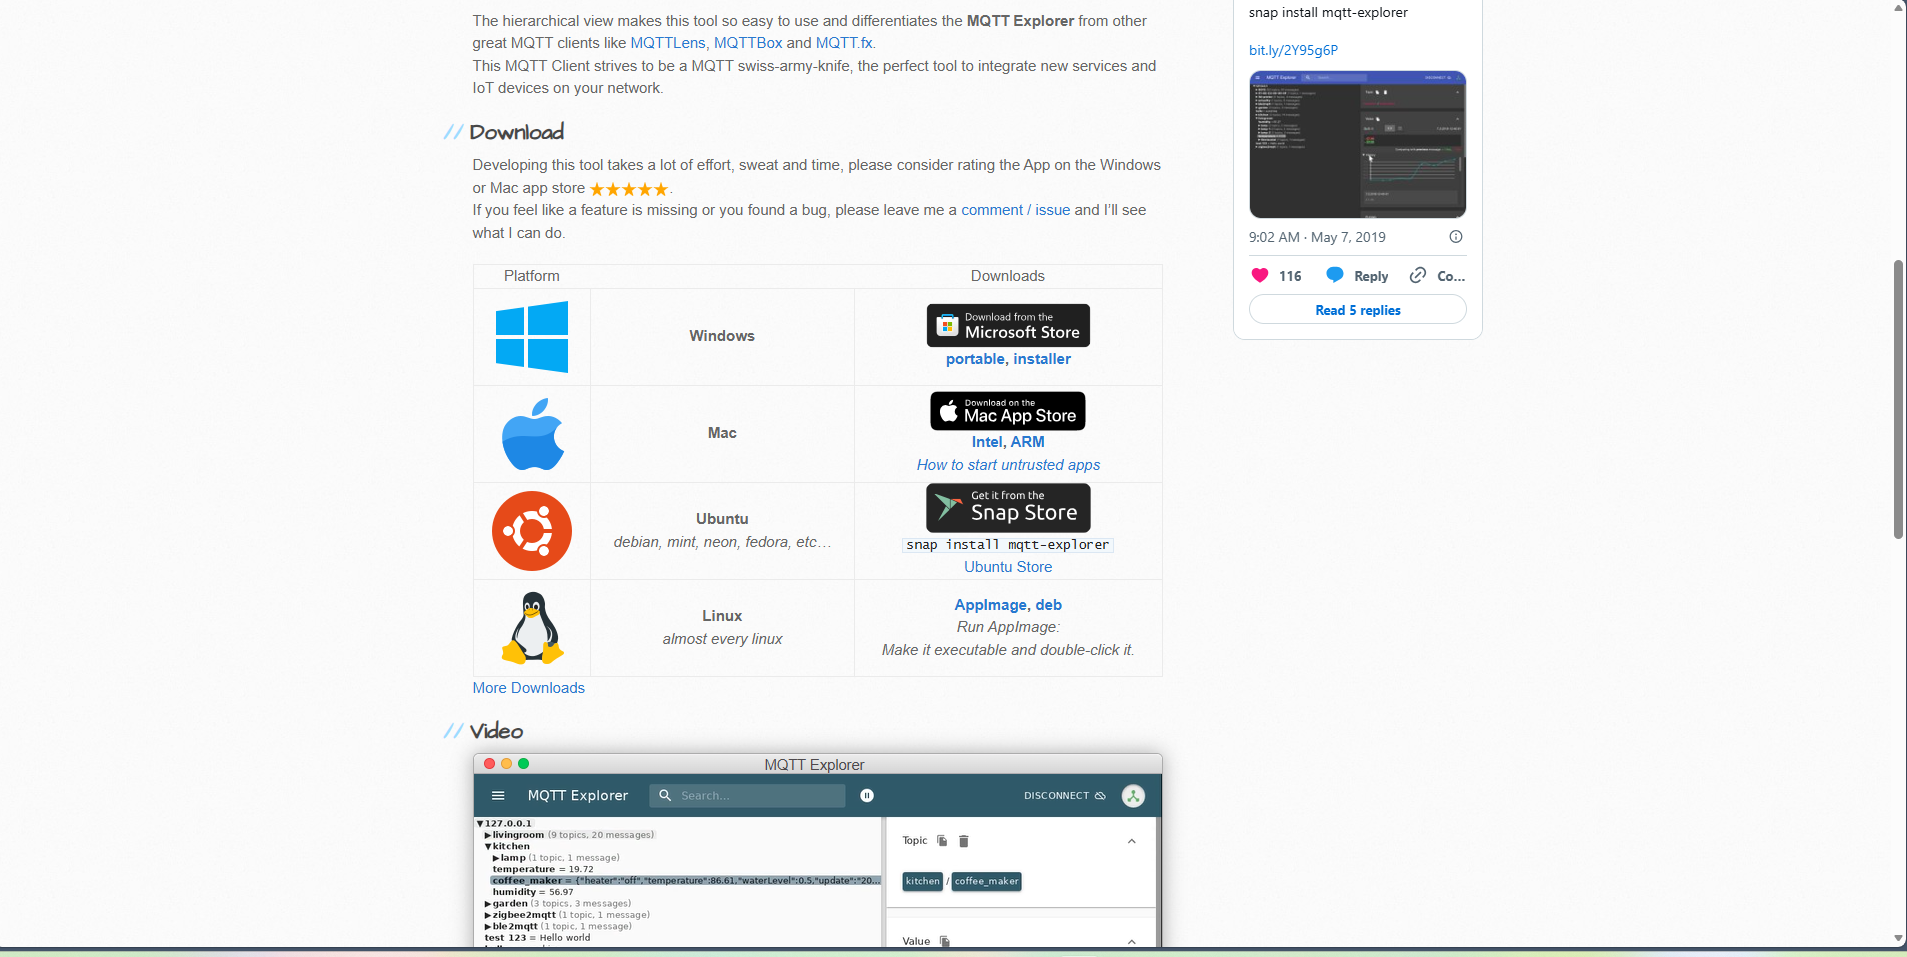
Installing MQTT Explorer
MQTT Explorer is a tool used to visualize MQTT messages. We'll use it to troubleshoot and to publish test messages.
- Navigate to https://mqtt-explorer.com → click the Windows installer.
- Go to File Explorer → Downloads → double-click the installer.
- Follow the installation steps until MQTT Explorer is installed.
Setting up the MQTT Broker
The broker reads its settings from a configuration file. We'll create a folder for it, write the config, and point Mosquitto at it.
1. Create the broker folder
In File Explorer, go to This PC → Windows (C:) → Users → User, and create a new folder named mqttbroker.
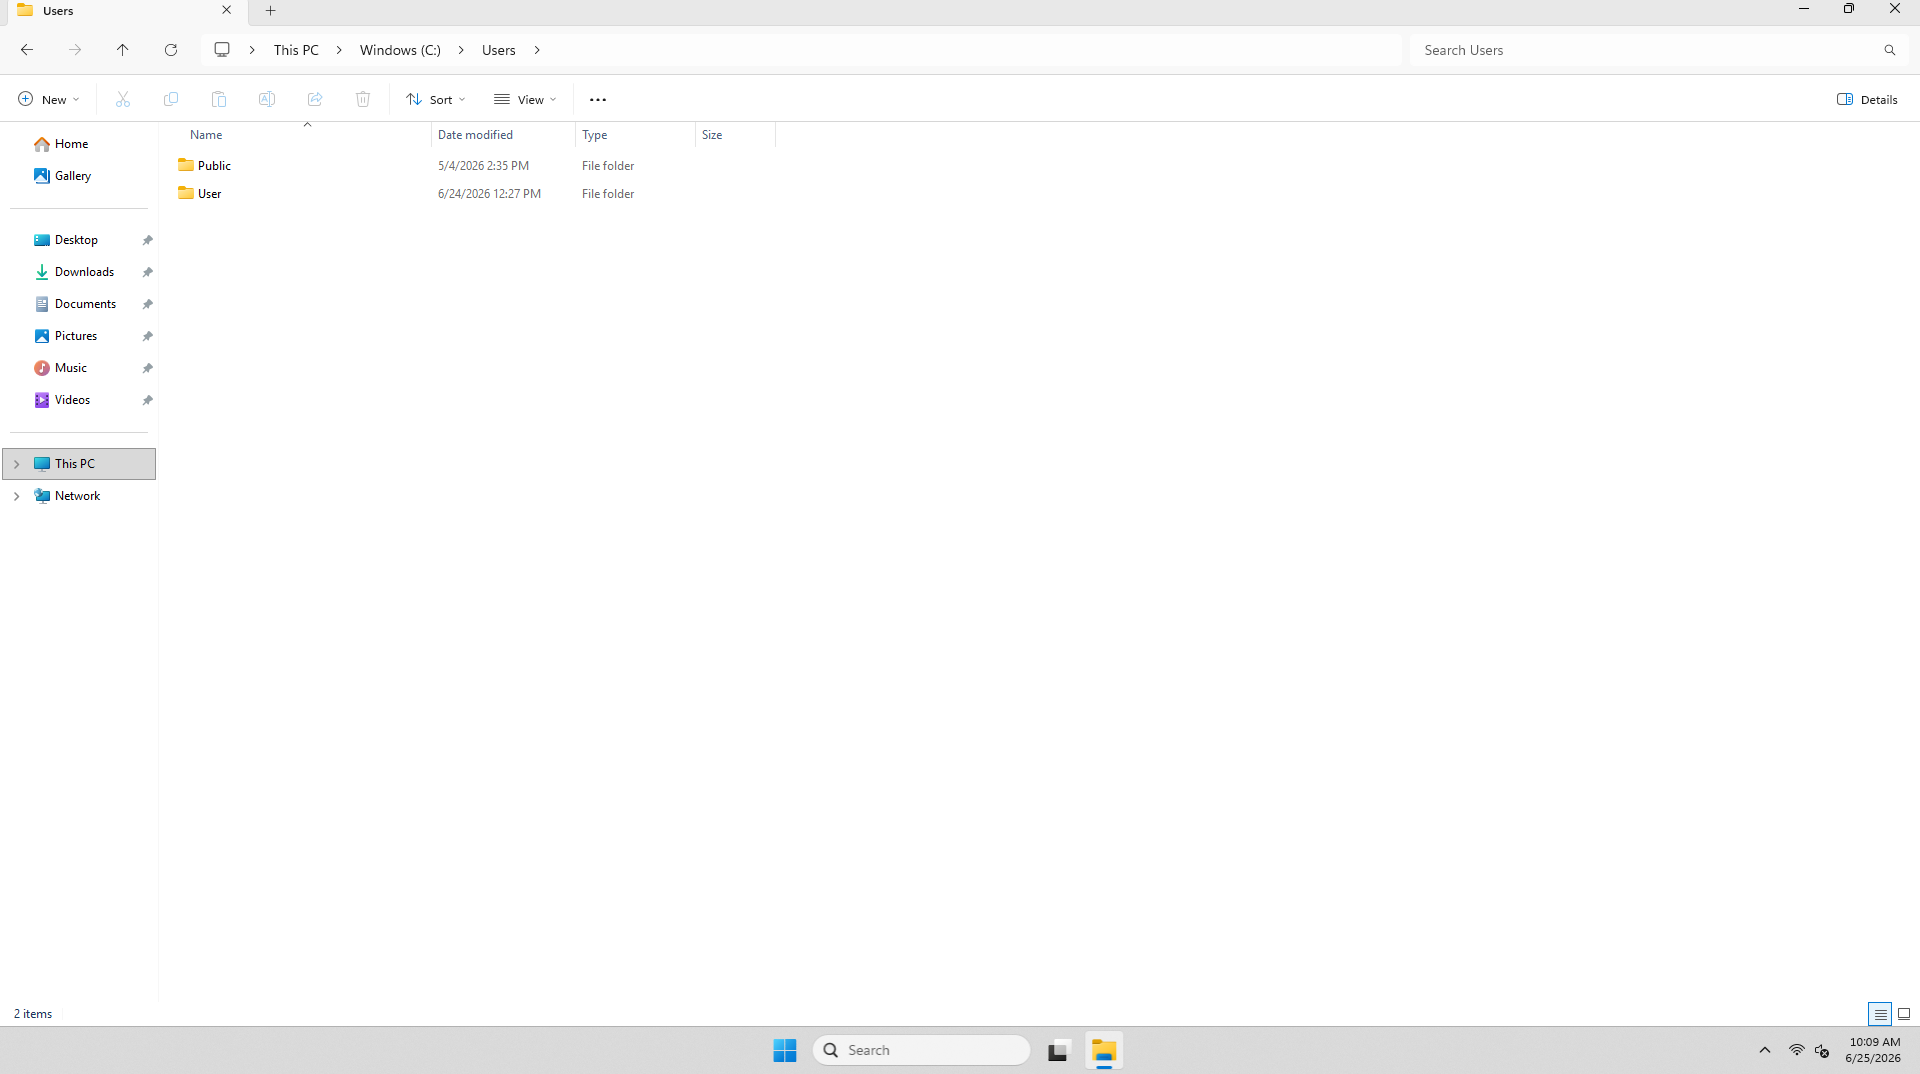
The full path will be:
C:\Users\User\mqttbroker\
2. Write the configuration file
Open Notepad (search for it in the Start bar) and type the following:
allow_anonymous true
listener 1883 192.168.1.112
listener 9001 0.0.0.0
protocol websockets
persistence true
persistence_file mosquitto.db
persistence_location C:\Users\User\mqttbroker\
log_type all
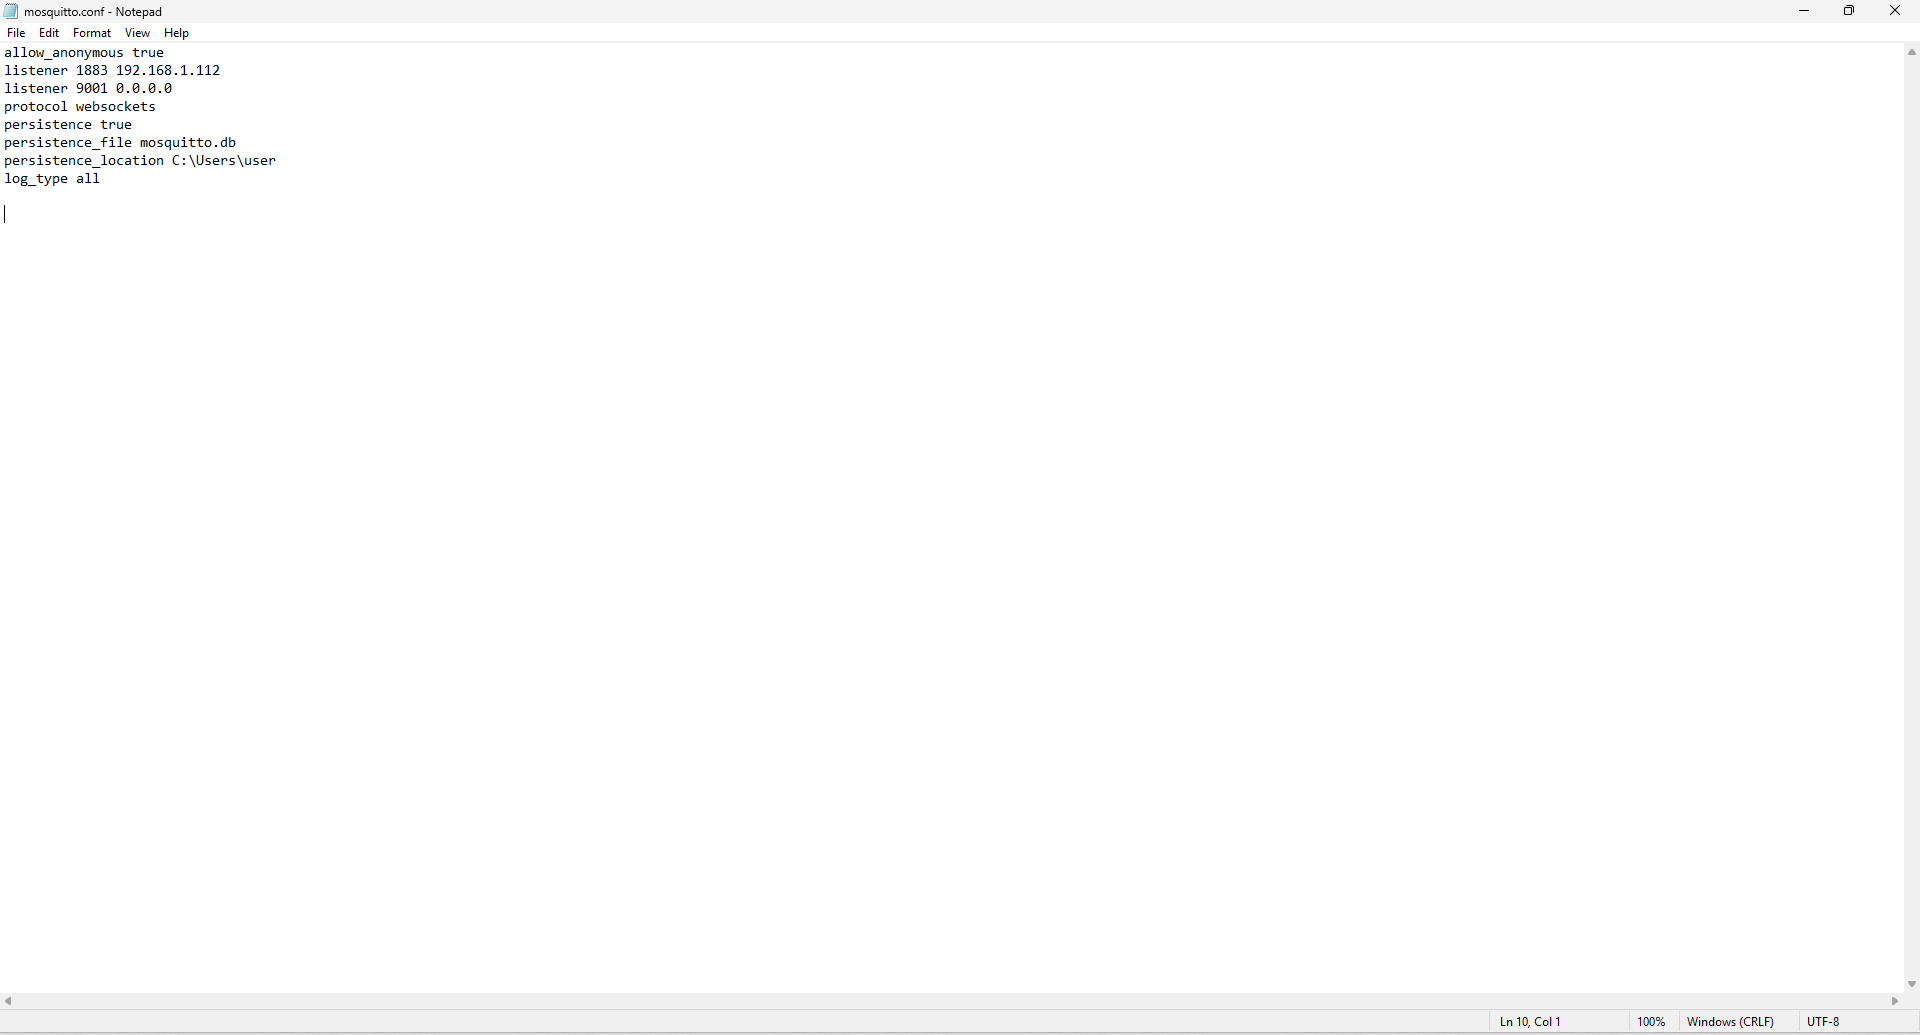
The listener 1883 line must use the PC's production IP — the 192.168.1.112 you returned the PC to above, not the temporary 169.254.101.202 link-local address.
What each line does — and why it's here:
| Line | What it does | Why we need it |
|---|---|---|
allow_anonymous true | Lets clients connect without a username/password | Fine for a trainer on an isolated network. Disable this in production. |
listener 1883 192.168.1.112 | Standard MQTT port, bound to the PC's IP | 1883 is the default MQTT port the PLC/SEH201 connect to |
listener 9001 0.0.0.0 | A second listener on port 9001, all interfaces | Used for the WebSockets protocol below |
protocol websockets | Enables MQTT over WebSockets on that listener | Lets browser-based dashboards connect |
persistence true | Saves broker state to disk | Retained messages/subscriptions survive a broker restart |
persistence_file mosquitto.db | The database filename | Where persisted state is stored |
persistence_location C:\Users\User\mqttbroker\ | Where to put that file | Keeps everything in our broker folder |
log_type all | Logs everything | Maximum visibility while learning/troubleshooting |
To read more about Mosquitto configuration options, see https://mosquitto.org/man/mosquitto-conf-5.html
3. Save the config file correctly
- In Notepad go to File → Save As.
- Navigate into the
mqttbrokerfolder you created. - Set File name to
mosquitto.conf. - Important: change Save as type from "Text Documents (*.txt)" to "All Files (*.*)", then click Save.
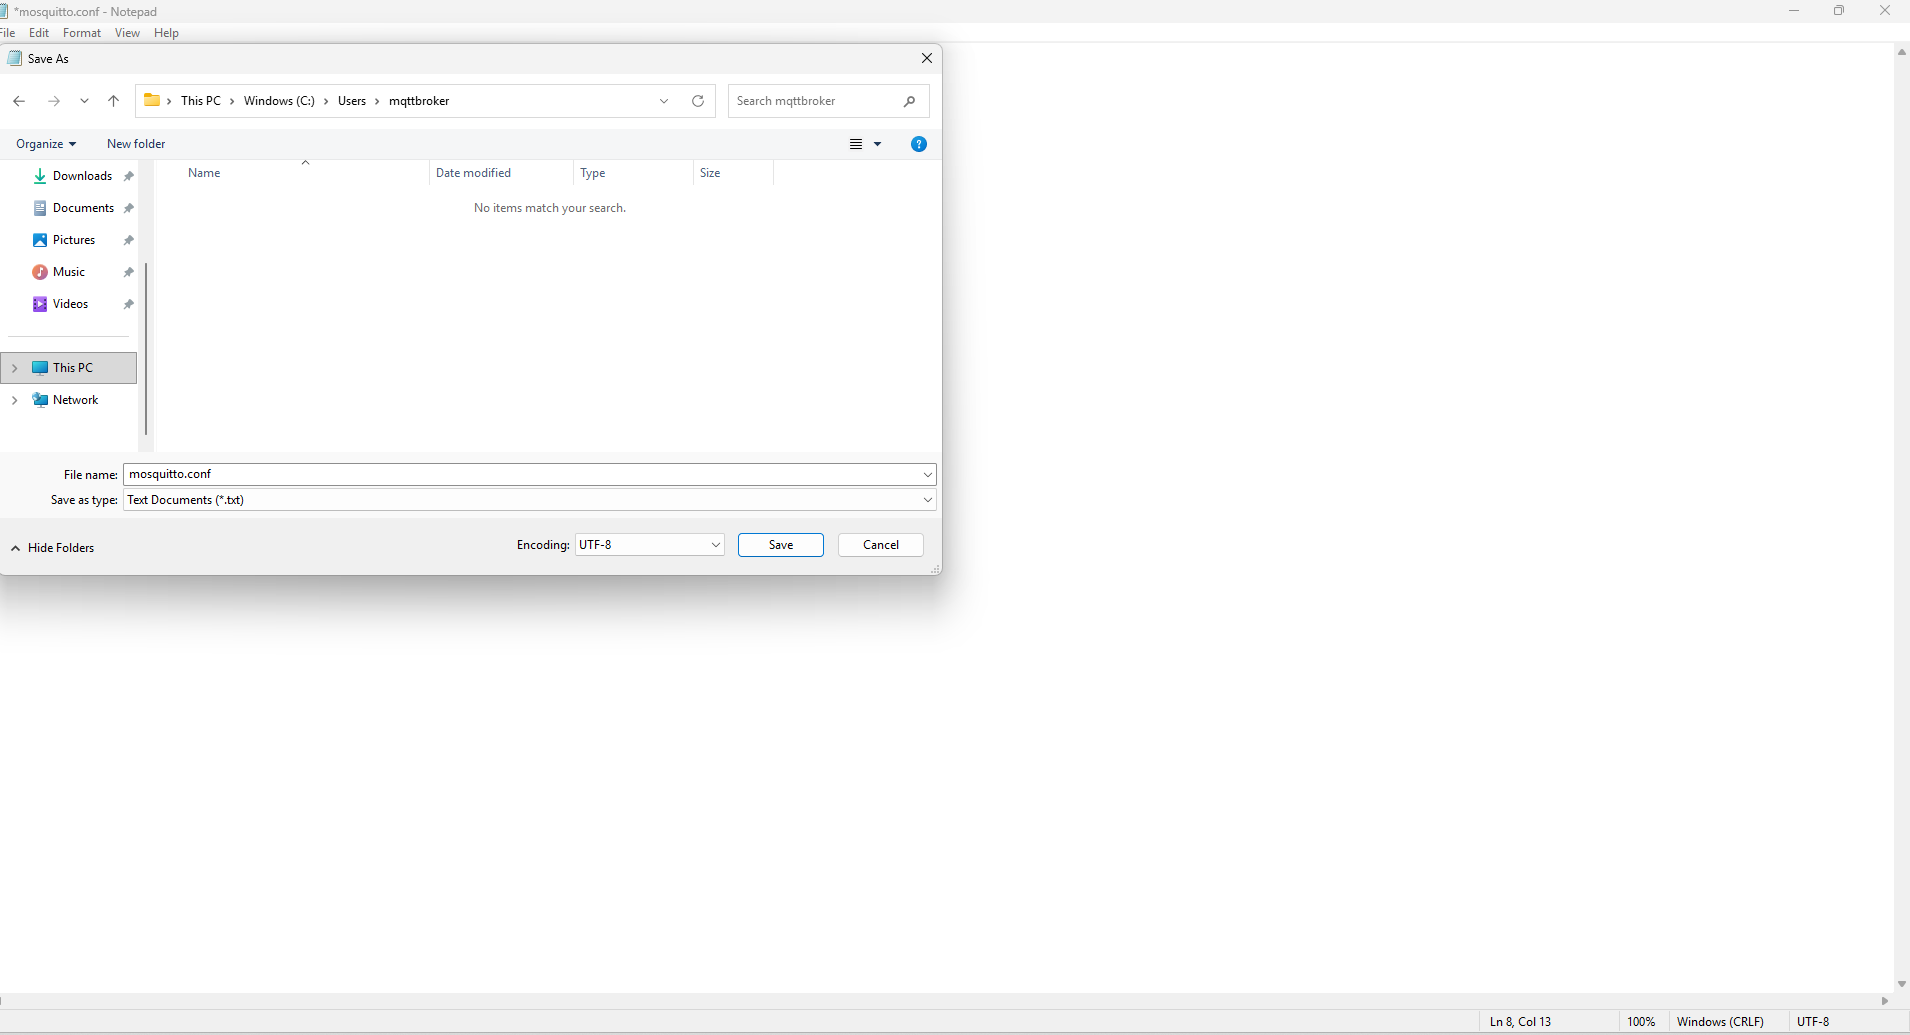
If you leave the type as "Text Documents," Notepad silently appends .txt, leaving you with mosquitto.conf.txt — which the broker won't recognize. Setting "All Files" saves it as a true .conf.
Starting the Broker
-
In the Start search bar, open PowerShell → right-click → Run as Administrator.
-
Change into the broker folder:
cd C:\Users\User\mqttbroker -
Only if your file ended up named
mosquitto.conf.txt, rename it. (If you saved as "All Files" above, skip this — the file is already correct.)Rename-Item ".\mosquitto.conf.txt" "mosquitto.conf" -
Start the broker, pointing it at your config:
& "C:\Program Files\Mosquitto\mosquitto.exe" -c "mosquitto.conf"
You should see the broker boot up and stay running in the terminal, with log lines like:
mosquitto version 2.1.2 starting
Config loaded from mosquitto.conf.
Opening ipv4 listen socket on port 1883.
Opening ipv4 listen socket on port 9001.
mosquitto version 2.1.2 running
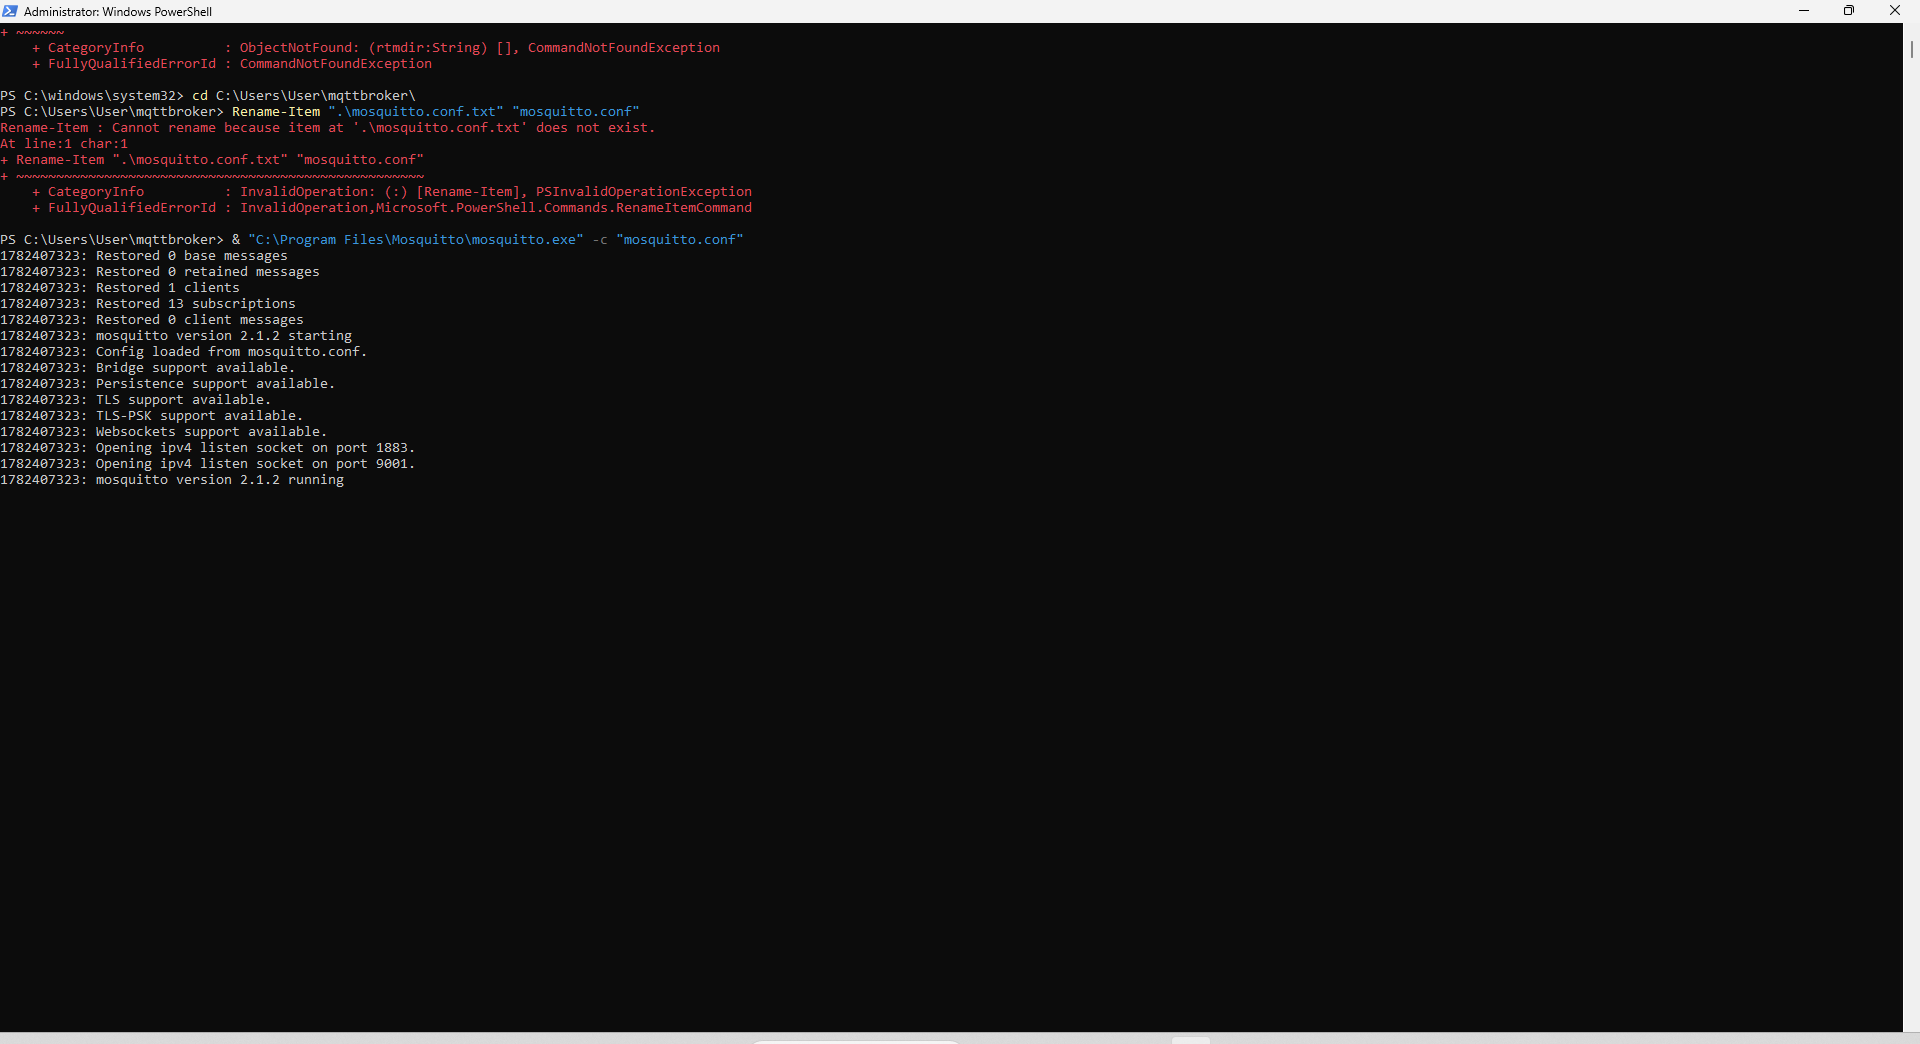
While learning, you want to see the live log — every connection and message shows up here, which makes the earlier log_type all setting pay off. In production you'd instead install Mosquitto as a Windows service so it starts automatically in the background. Closing this PowerShell window stops the broker.
The SEH201 should now connect to the broker. You will see setup messages in the terminal from the SEH201.
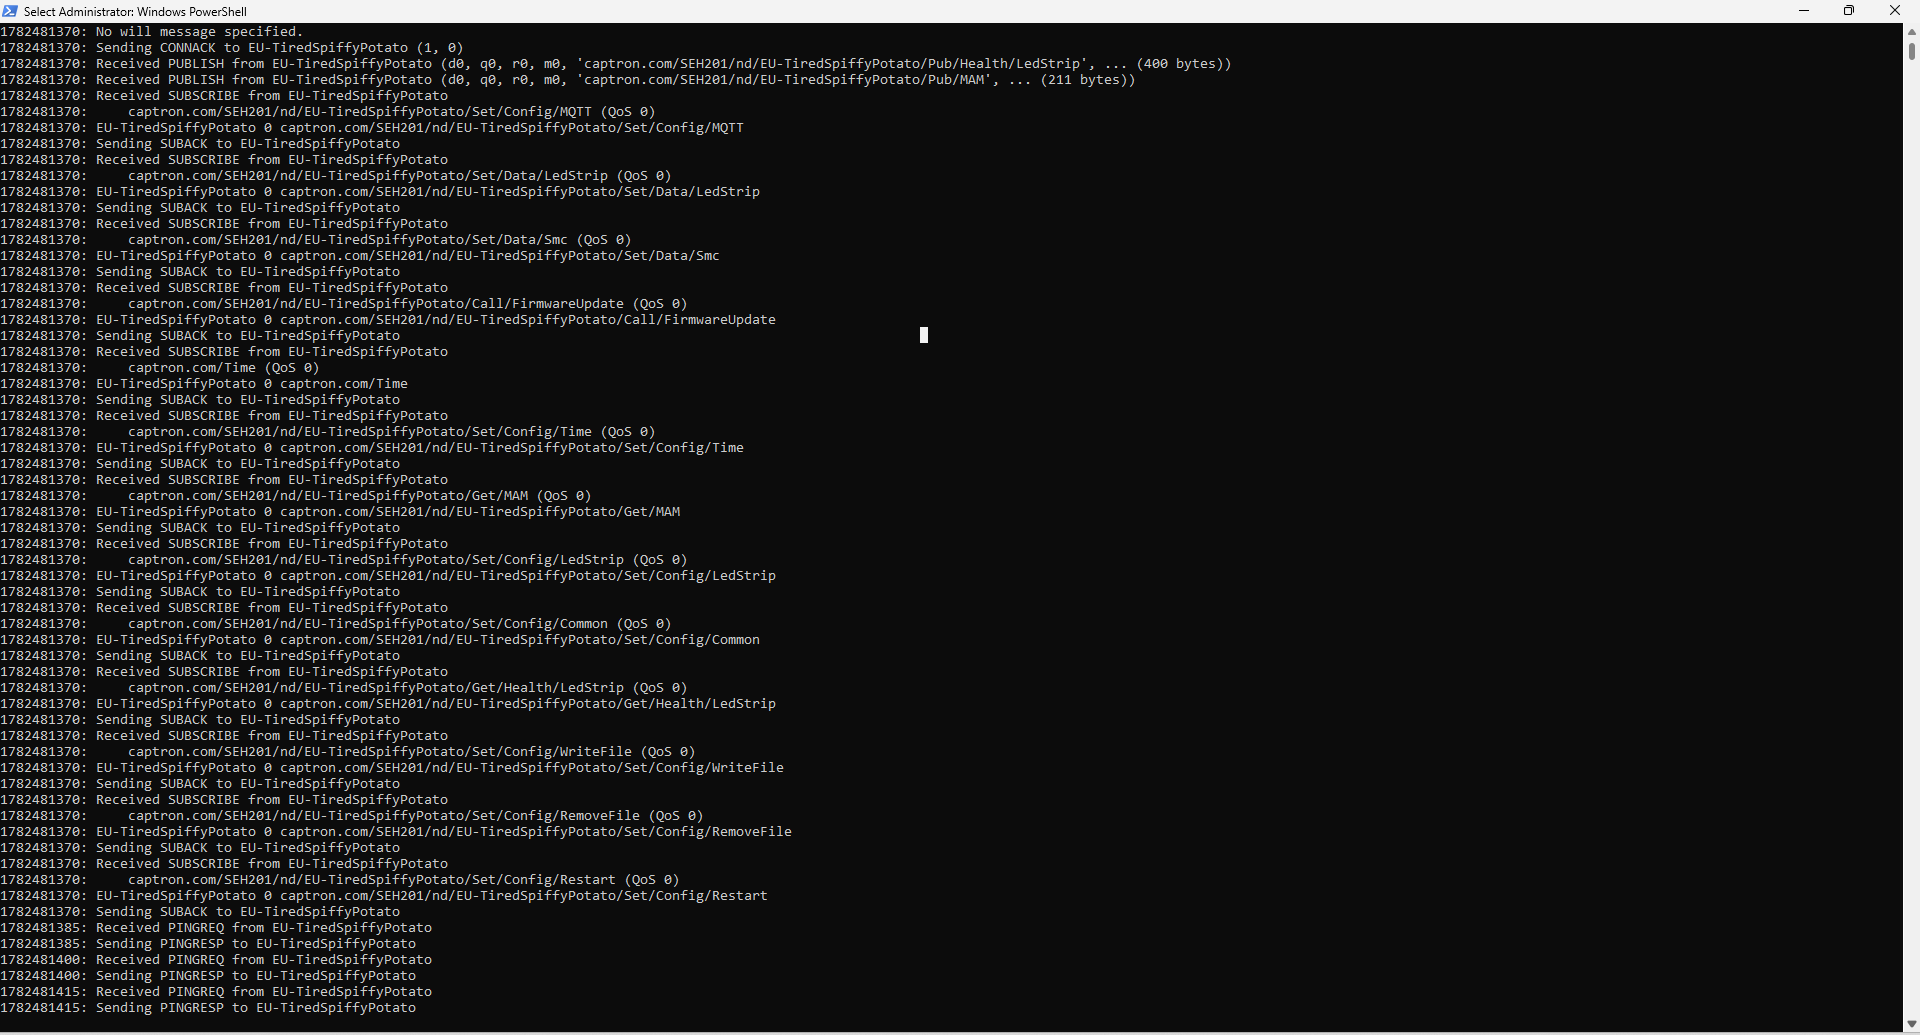
Using MQTT Explorer
Now we can start up MQTT Explorer and connect to the broker to help with visualization.
- Open MQTT Explorer.
- Enter the IP address of the IPC (the broker) under Host.
- Click Connect.
Once connected, you'll see any messages published between the SEH201 and the broker. For example, you can power-cycle the SEH201 to watch its startup messages appear.
Verifying the SEH201 Connection
The controller is already configured and the broker is running. This step confirms the controller actually reached the broker before you start sending payloads.
-
Ping the SEH201's IP address — confirm the PC can reach the controller on the production subnet.
ping 192.168.1.26A reply means the PC and SEH201 are on the same subnet and can talk. If ping fails, it's a wiring/subnet problem (or the PC is still on
169.254.101.x) — not an MQTT problem. -
Check the MQTT connection — confirm the SEH201 shows up as a connected client. Watch the broker's PowerShell log for a new client connection, or look for the controller's topic tree appearing in MQTT Explorer.
First Message
LED strips
On the right-hand side of MQTT Explorer there's a topic field and a message field. We'll use these to publish messages to the SEH controller and control the LED strips.
The topic. Every command to the LED strips uses this topic:
captron.com/<device>/nd/<unique-id>/Set/Data/LedStrip
<device>— the controller model you're using for your application (e.g.SEH11,SEH101,SEH201).<unique-id>— the controller's unique ID (printed on the device; you'll also see it in the broker traffic).
For example, the topic is:
captron.com/SEH201/nd/EU-TiredSpiffyPotato/Set/Data/LedStrip
The payload. Every payload is in JSON format. The example payload for testing is below — it turns LEDs 0 through 15 green:
{
  "LED_STRIP_1": {
    "Active": true,
    "Segments": [
      {
        "StartLED": 0,
        "StopLED": 15,
        "Speed": 100,
        "Effect": 1,
        "Colors": [
          { "R": 0, "G": 255, "B": 0 },
          { "R": 0, "G": 255, "B": 0 }
        ]
      }
    ]
  }
}
"Active" works; "active" does not. A wrong-case key produces no error — the controller silently ignores it. Copy the example exactly.
Explanation of the payload:
| Field | Meaning |
|---|---|
LED_STRIP_1 | Which strip you're changing. If you have multiple LED strips, adjust the number. |
Active | true applies the change; false and the strip won't change. |
Segments | The options for what the LED strip outputs. |
StartLED | Where the lit output starts. Oriented toward the start of the strip (the lead-cable end). |
StopLED | Where the lit output stops. |
Speed | Range 1–250. Higher number = faster effect. |
Effect | Range 1–6 (plus 200). Each value is a different effect — see the table below. |
Colors | Two RGB values are listed. This is for the multi-picker effect (6). If multi-picker isn't selected, the first RGB listed is used. |
Effect values:
| Value | Effect |
|---|---|
| 1 | FX_MODE_STATIC |
| 2 | FX_MODE_BLINK |
| 3 | FX_MODE_FLASH |
| 4 | FX_MODE_LEADING_LINES |
| 5 | FX_MODE_LEADING_LINES_REVERSE |
| 6 | FX_MODE_MULTPICKER |
| 200 | FX_MODE_CUSTOMER_KNIGHT_RIDER |
Change StopLED, the Colors RGB values, or Effect and re-publish to the same topic — the strip's output changes. That is exactly what a PLC does in production: same topic, different payload as conditions change.
SMC47 push buttons
The SMC47 buttons are daisy-chained, so before you can talk to one individually you must give each button a unique address. This is a one-time sequence of MQTT messages you can send straight from MQTT Explorer.
The buttons keep their assigned address even after a power loss — so you normally only run the assign sequence once. The button states (the look for each phase below), however, are not retained across a power cycle and must be re-sent. Your PLC must re-send the states on startup.
Each button has three possible states:
| State | When it applies |
|---|---|
| PRE-pressed | The default/idle look before the button is touched. |
| POST-pressed | The look after the button is touched (confirmed). |
| LONG-pressed | The look after a long touch (when long-press mode is enabled). |
Step 1 — Assign an address
In MQTT Explorer, publish these three messages in order, all to the topic:
captron.com/<device>/nd/<device-id>/Set/Data/Smc
(For our example: captron.com/SEH201/nd/EU-TiredSpiffyPotato/Set/Data/Smc.)
a. Show an effect on all buttons:
{
  "Address": "ALL_SENSORS",
  "CommandType": "SET_PARAMETER",
  "Offset": "PRE_BUTTON_MODE",
  "PAYLOAD": "ENABLED//COLCYAN_CIRCLE_ANIMATED_CLOCK/@@@@"
}
b. Set all buttons to the PRE-pressed state:
{
  "Address": "ALL_SENSORS",
  "CommandType": "SET_STATUS",
  "Offset": "SPECIAL_COMMANDS",
  "PAYLOAD": "PRE_PRESSED_STATE"
}
c. Send the address to assign:
{
  "Address": "ALL_SENSORS",
  "CommandType": "SET_STATUS",
  "Offset": "ADDRESS_TO_BE_ASSIGNED",
  "PAYLOAD": "1000"
}
Then touch the button you want to give that address to. We recommend assigning the lowest address (1000) to the first button in the daisy-chain order. To assign the rest, increase the address by one (1001, 1002, …), publish, and touch the next button. Repeat for all buttons.
Step 2 — Set the pre-pressed state
Topic: captron.com/<device>/nd/<device-id>/Set/Data/Smc
{
  "Content": "/Set/Data/Smc",
  "Address": "1000",
  "CommandType": "SET_PARAMETER",
  "Offset": "PRE_BUTTON_MODE",
  "Payload": "{Mode}/{Quantity}/{LED ring color}/{LED ring effect}/{Display text}"
}
Example — solid blue ring with the number 42 displayed:
{
  "Content": "/Set/Data/Smc",
  "Address": "1000",
  "CommandType": "SET_PARAMETER",
  "Offset": "PRE_BUTTON_MODE",
  "Payload": "ENABLED/42/COLBLUE/SOLID_RING"
}
Step 3 — Set the post-pressed state
Same topic — just change the Offset to POST_BUTTON_MODE:
{
  "Content": "/Set/Data/Smc",
  "Address": "1000",
  "CommandType": "SET_PARAMETER",
  "Offset": "POST_BUTTON_MODE",
  "Payload": "{Mode}/{Quantity}/{LED ring color}/{LED ring effect}/{Display text}"
}
Example — solid blue ring, display donE:
{
  "Content": "/Set/Data/Smc",
  "Address": "1000",
  "CommandType": "SET_PARAMETER",
  "Offset": "POST_BUTTON_MODE",
  "Payload": "ENABLED//COLBLUE/SOLID_RING/donE"
}
Payload option reference
The button Payload string is five fields separated by /:
{Mode}/{Quantity}/{LED ring color}/{LED ring effect}/{Display text}
1. Mode — whether the button can be confirmed:
| Value | Meaning |
|---|---|
ENABLED | Button can be confirmed; LED ring and display can be controlled. |
DISABLED | Button can not be confirmed; LED ring and display can still be controlled. |
LONGPRESS_ENABLED | Button enters the long-press state after a held touch (default ~2 s); set its long-press look via the POST_BUTTON_MODE offset. |
2. Quantity — a number from 1 to 9999, automatically centered on the display. (Leave this field empty to use the Display text field instead.)
3. LED ring color:
COLRED | COLMAGENTA |
COLGREEN | COLCYAN |
COLBLUE | COLWHITE |
COLYELLOW | COLOFF (ring off) |
4. LED ring effect:
SOLID_RING | FLASH_ARROW_UP |
FLASH_RING | FLASH_ARROW_DOWN |
CONFIRM | FLASH_ARROW_LEFT |
POINT_ANIMATED_CLOCK | FLASH_ARROW_RIGHT |
CIRCLE_ANIMATED_CLOCK | ANIMATED_ARROW_UP |
SOLID_ARROW_UP | ANIMATED_ARROW_DOWN |
SOLID_ARROW_DOWN | ANIMATED_ARROW_LEFT |
SOLID_ARROW_LEFT | ANIMATED_ARROW_RIGHT |
SOLID_ARROW_RIGHT |
5. Display text — up to 4 characters on the 7-segment display:
- Use
@as a blank/space character. - If both Quantity and Display text are provided, Quantity wins. With Display text there's no auto-alignment — you place the characters yourself: left-aligned
42@@, right-aligned@@42. (Quantity aligns automatically.) - Examples:
@Go@,donE.
Some characters can't be shown due to 7-segment display limits.
Enabling polling
Polling lets the controller actively report when a button is pressed. Publish the same /Set/Data/Smc topic using the HUB address and a /-separated list of button addresses to poll (up to 6):
{
  "Address": "HUB",
  "CommandType": "SET_PARAMETER",
  "Offset": "",
  "Payload": "1000/1001/1002"
}
- Use
0000as the payload to turn polling off. - When polling is on and a button is touched, the controller publishes a response on
Pub/Data/Smcwith that button's address andPayload: POST_PRESSED_STATE.
A ready-to-copy version of each step is in Example topics and Payloads below.
Walkthrough Synopsis
A quick recap of everything the walkthrough covered, one line per step:
- Powered on the trainer — connected peripherals and booted the industrial PC.
- Changed the subnet — put the PC on
169.254.101.xto reach the SEH201's default address and open its webserver. - Configured the SEH201 — pointed the controller at the broker's IP and gave it a production IP on the
192.168.1.xsubnet. - Returned the PC to the production subnet — moved the PC to
192.168.1.112so it and the controller share the same network. - Installed the software — Eclipse Mosquitto (the broker) and MQTT Explorer (the visualizer).
- Set up and started the broker — wrote
mosquitto.conf, then launched Mosquitto so it listens on ports 1883 and 9001. - Connected and verified — used MQTT Explorer to watch broker traffic and confirmed the SEH201 was online via ping and a live connection.
- Sent the first message — published payloads to drive the LED strip and configure the SMC47 buttons.
Scaling for your Application
Next Steps
- Read about Python integration
- Read about PLC integration (Allen-Bradley, Beckhoff, AutomationDirect)
- CAPTRON Solutions Buying Guide
Application Examples
Example topics and Payloads
This section provides payloads and topics to copy and paste for integration purposes. The device ID is a unique identifier on each SEH controller. The ID is listed on the device.
LED strip activation. Payload turns LED's 0 through 80 green.
Topic:
captron.com/SEH201/nd/<device-id>/Set/Data/LedStrip
Message Payload Data:
{
  "LED_STRIP_1": {
    "Active": true,
    "Segments": [
      {
        "StartLED": 0,
        "StopLED": 80,
        "Speed": 100,
        "Effect": 1,
        "Colors": [
          { "R": 0, "G": 255, "B": 0 },
          { "R": 0, "G": 255, "B": 0 }
        ]
      }
    ]
  }
}
First step in setting address of SMC. Send a message to show an effect.
Topic:
captron.com/SEH201/nd/Set/Data/Smc
Message Payload Data:
{
  "Address": "ALL_SENSORS",
  "CommandType": "SET_PARAMETER",
  "Offset": "PRE_BUTTON_MODE",
  "PAYLOAD": "ENABLED//COLCYAN_CIRCLE_ANIMATED_CLOCK/@@@@"
}
Second step in setting address of SMC. Set all SMC's to PRE-state.
Topic:
captron.com/SEH201/nd/Set/Data/Smc
Message Payload Data:
{
  "Address": "ALL_SENSORS",
  "CommandType": "SET_STATUS",
  "Offset": "SPECIAL_COMMANDS",
  "PAYLOAD": "PRE_PRESSED_STATE"
}
Third step in setting addresses of SMC. Send assign message with the address to be used.
Topic:
captron.com/SEH201/nd/Set/Data/Smc
Message Payload Data:
{
  "Address": "ALL_SENSORS",
  "CommandType": "SET_STATUS",
  "Offset": "ADDRESS_TO_BE_ASSIGNED",
  "PAYLOAD": "1000"
}
Reset address on all SMC buttons.
Topic:
captron.com/SEH201/nd/Set/Data/Smc
Message Payload Data:
{
  "Address": "ALL_SENSORS",
  "CommandType": "SET_PARAMETER",
  "Offset": "ADDRESS_BTN_LOW_BYTE",
  "PAYLOAD": "FFFE"
}
{
  "Address": "ALL_SENSORS",
  "CommandType": "SET_STATUS",
  "Offset": "SPECIAL_COMMANDS",
  "Payload": "REBOOT"
}
Enable Polling from the SMC buttons with the address 1008 and 1009.
Topic:
captron.com/SEH201/nd/Set/Data/Smc
Message Payload Data:
{
  "Address": "HUB",
  "CommandType": "SET_PARAMETER",
  "Offset": "",
  "Payload": "1008/1009"
}
Example setting pre pressed state for address 1000.
Topic:
captron.com/SEH201/nd/Set/Data/Smc
Message Payload Data:
{
  "Content": "/Set/Data/Smc",
  "Address": "1000",
  "CommandType": "SET_PARAMETER",
  "Offset": "PRE_BUTTON_MODE",
  "Payload": "ENABLED/42/COLBLUE/SOLID_RING"
}
Setting post pressed state for address 1000.
Topic:
captron.com/SEH201/nd/Set/Data/Smc
Message Payload Data:
{
  "Content": "/Set/Data/Smc",
  "Address": "1000",
  "CommandType": "SET_PARAMETER",
  "Offset": "POST_BUTTON_MODE",
  "Payload": "ENABLED//COLBLUE/SOLID_RING/donE"
}
Switching to prepressed state for address 1000.
Topic:
captron.com/SEH201/nd/Set/Data/Smc
Message Payload Data:
{
  "Content": "/Set/Data/Smc",
  "Address": "1000",
  "CommandType": "SET_STATUS",
  "Offset": "SPECIAL_COMMANDS",
  "Payload": "PRE_PRESSED_STATE"
}
Trouble Shooting
| Symptom | Likely cause | Check |
|---|---|---|
| LEDs/buttons don't respond at all | Wrong subnet / no network path | ping the SEH201; confirm the PC and controller share the same 192.168.1.x subnet |
| Message sent, nothing happens, no error | Typo'd topic (silently dropped) | Subscribe to # in MQTT Explorer and verify the topic arrives |
| Payload ignored | Wrong-case JSON key | Match the example casing exactly (Active, not active) |
| Broker won't start | Config saved as .conf.txt | Confirm the real filename; re-save as "All Files" |
| Everything resets after a power blip | Controller state isn't persisted | Controller state clears on power loss — the PLC must re-send states on startup |
| Clients can't connect | Broker not running / window closed | Confirm the PowerShell broker window is still open and "running" |
Glossary
| Broker | The central MQTT server that receives every published message and routes it to subscribed clients. In this trainer, the TB-6293 running Mosquitto. |
| Daisy-chain | Wiring multiple devices in series off one cable/port. Up to 5 SMC47 buttons daisy-chain to one SEH201 over a single M8 cable. |
| DHCP | Dynamic Host Configuration Protocol. Automatically assigns IP addresses on a network. We disable it in favor of a static IP so the broker's address never changes. |
| DNS | Domain Name System. Translates hostnames into IP addresses; entered on the PC and controller for the device to operate properly. |
| Gateway | The router IP address a device uses to reach addresses outside its own subnet. |
| IK07 | Impact protection rating defined by IEC 62262. "07" means the enclosure withstands a 2-joule impact (roughly a 500 g object dropped from 400 mm). |
| IoT | Internet of Things. A network of physical devices — sensors, controllers, machines — that communicate over a network, typically using lightweight protocols like MQTT. |
| IP67 | Ingress protection rating defined by IEC 60529. "6" means fully dust-tight; "7" means protected against temporary immersion in water (up to 1 m for 30 minutes). |
| JSON | JavaScript Object Notation. A lightweight, human-readable text format for structuring data as key/value pairs and arrays. SEH controllers expect payloads in JSON. |
| Link-local address | An auto-assigned address in the 169.254.x.x range used when no DHCP server is present. The SEH201's default address (169.254.101.201) is link-local. |
| LWT | Last Will and Testament. A message a client registers with the broker on connection. If the client disconnects unexpectedly, the broker publishes the LWT on its behalf so subscribers know the device went offline. |
| M8 | A circular industrial connector standard with an 8 mm thread diameter. The SEH201 uses a 4-pin M8 to daisy-chain SMC47 buttons. |
| Mosquitto | Eclipse Mosquitto — the free, open-source MQTT broker software used as the broker in this trainer. |
| MQTT | Message Queuing Telemetry Transport. A lightweight publish/subscribe messaging protocol designed for IoT and resource-constrained devices. |
| MQTT Explorer | A free desktop tool that visualizes the broker's topic tree in real time and can publish test messages. |
| Payload | The actual content/data of an MQTT message. SEH payloads are case-sensitive JSON. |
| Pick-to-light | An order-picking method where lights/buttons direct an operator to the correct bin and confirm the pick. A primary SMC47 use case. |
| PLC | Programmable Logic Controller. An industrial computer used to automate machines and processes; in this trainer, it acts as the MQTT publisher. |
| PoE | Power over Ethernet. Allows users to power hardware through an Ethernet switch/port, eliminating a separate power cable. |
| Publisher | Any client that sends messages to the broker on a topic. In this trainer, the PLC. |
| QoS | Quality of Service. The MQTT setting defines delivery reliability. Three levels: 0 (at most once), 1 (at least once), 2 (exactly once). Negotiated per-hop. |
| RGB | Red, Green, Blue. The color model used to specify LED colors as three 0–255 channel values. |
| Static IP | A manually-assigned, fixed IP address (as opposed to DHCP). Used so the broker and controller addresses stay constant. |
| Subnet | A logical division of an IP network. Devices must share a subnet (e.g. 192.168.1.x) to communicate directly. |
| Subscriber | Any client that listens for messages on chosen topics. In this trainer, the SEH201. |
| TCP/IP | Transmission Control Protocol / Internet Protocol. The standard networking stack MQTT runs on top of. |
| Topic | The hierarchical address string (levels separated by /) that tells the broker where a message goes. |
| WebSockets | A protocol that carries MQTT over standard web connections, letting browser-based dashboards connect (port 9001 in the broker config). |
| Wildcard | A subscription symbol: + matches one topic level, # matches everything below a point. Subscribers only. |